• Home
  • Meet Kim
  • Blog
    • Facebook
    • Instagram
    • Pinterest
    • Twitter
    • YouTube

Sand and Sisal

  • DIY
  • Home Tour
  • Decorating
  • Gardening
  • Recipes
  • Thanksgiving
  • Decor Crafts
  • Seasonal
  • Christmas/New Years
  • Winter/Valentines
  • Spring/Easter
  • Summer Holidays
  • Fall
  • Halloween

July 24, 2012 ·

Summer Blogger Blitz: East Coast Creative

Blogging· DIY· guest posting

Prev postNext post
Use your ← → (arrow) keys to browse

Talk about a talented duo!  We all teamed up with other amazing bloggers earlier this year did the Blogging 2 Better Challenge, each creating unique DIY projects with a specific list of random items. These ladies are also my co-contributors over at Infarrantly Creative. Let me introduce the ladies of East Coast Creative in my Summer Blogger Blitz!

Hey there!  I’m Jess, and I blog with my best friend, Monica, over at East Coast Creative.  You might recognize our faces, but not our name, which might be because we used to be The Real Housewives of Bucks County (or maybe that still doesn’t help, but at least now you know who we are!)


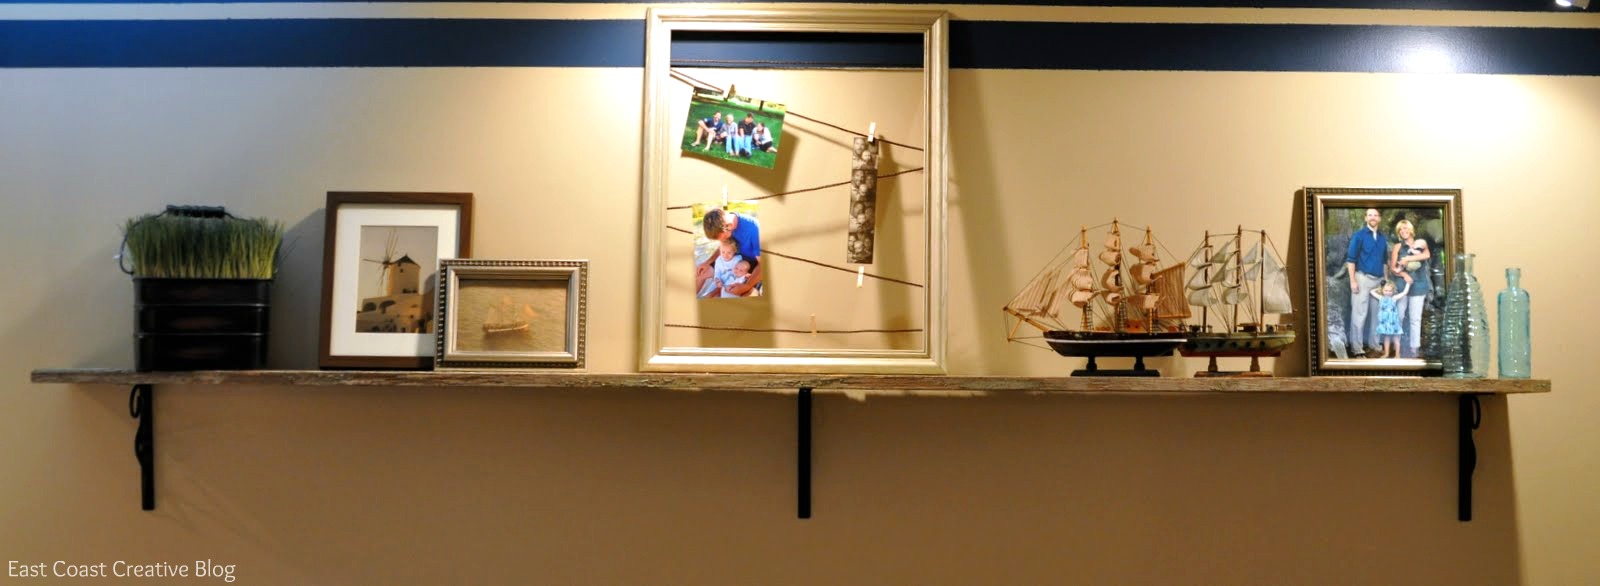
We blog about all things DIY and home decor, and toss plenty of real life in there, too.  We’re big fans of Kim and were so excited that we actually got to meet her in real life at Haven! We wanted to show you a project that would fit in perfectly in Kim’s beautiful house by the beach, or anyone’s house for that matter! DIY Barnwood Shelves!
 
 
Monica and I sort of have a love affair with barn wood, and since we have an endless supply (my father-in-law has a barn!), we put it to good use in our homes. This project could not be any easier, but the affect is so charming and so beach-cottagey. All you need are brackets (ours are from Lowes), screws and a piece of barn wood!


Monica originally made this shelf for our very first Nate Berkus show challenge, and they’ve held up amazingly well! Just cut your board to size using a chop saw, make marks on the wall where you want the brackets to go (after leveling, of course!), and screw them into the wall and then into the board.


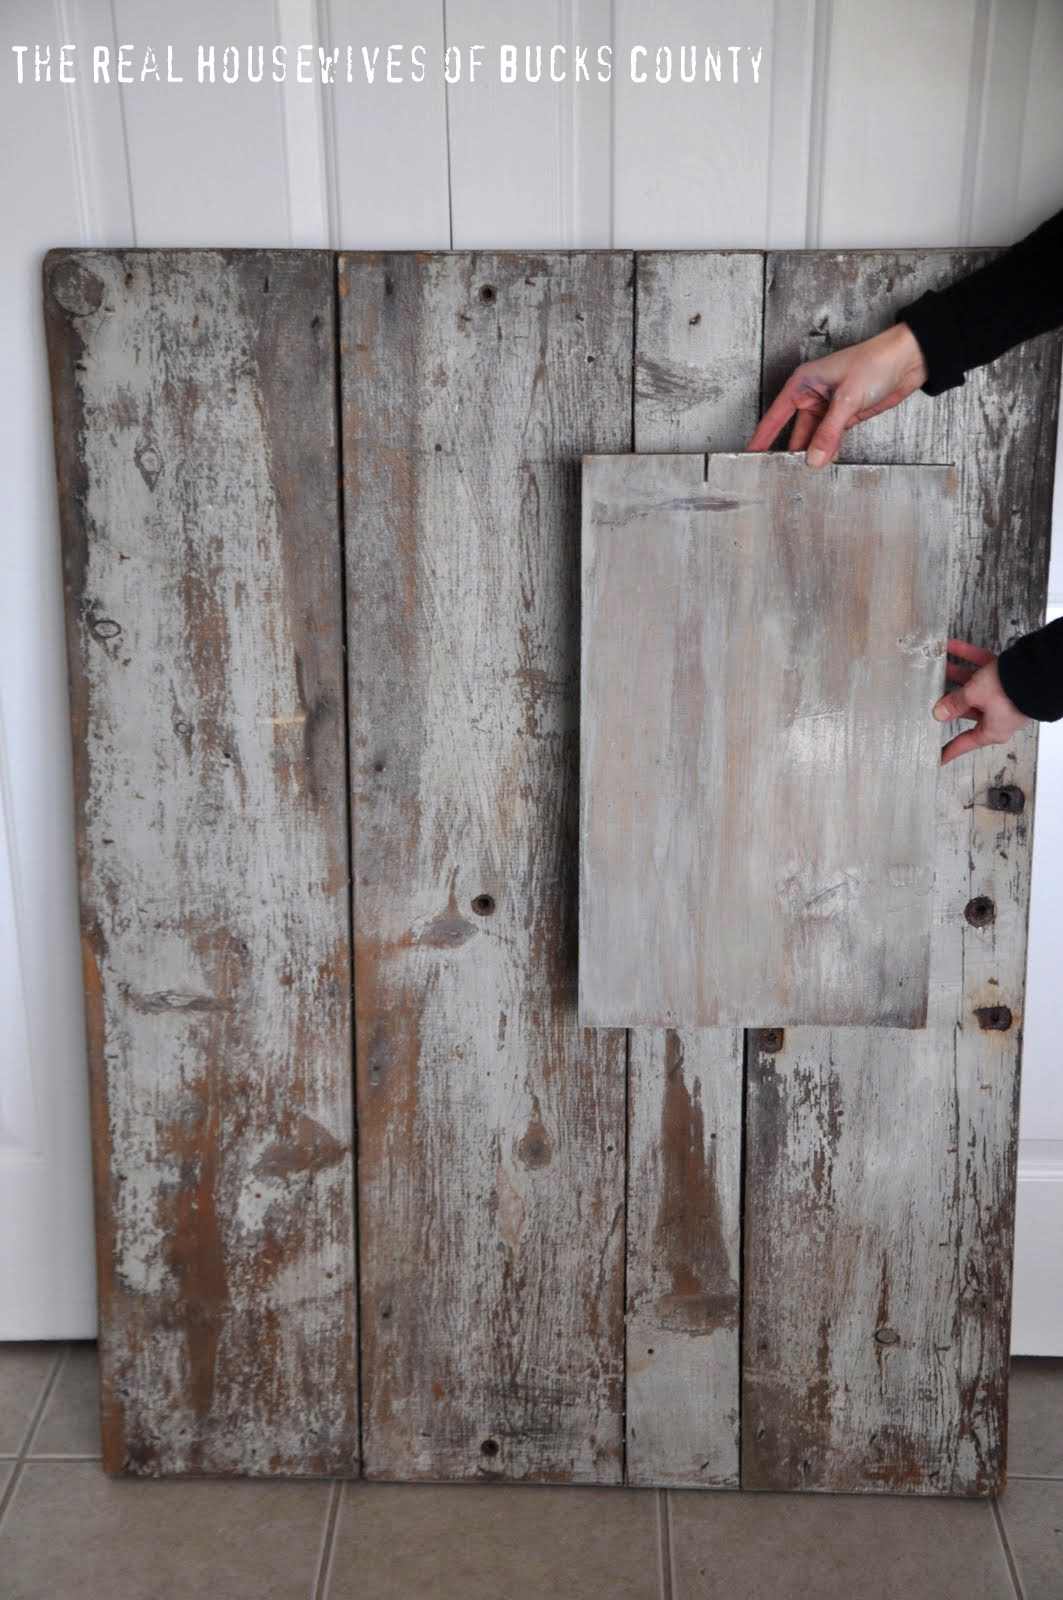
See? I told you it was a piece of cake! But wait! You don’t have barnwood laying around your garage? We’ve got you covered! We figured out how to recreate that beautiful aged barn wood look with paint, glaze and a sanding block. Here’s what you’ll need to do:
 
 
We used a very dry brush to paint Benjamin Moore’s Beach Glass on the wood. The key here is not to cover up all of the wood, just brush it on randomly. We are not aiming for perfect coverage here! Then, we wiped on Valspar’s Translucent Color Glaze in Mocha, focusing on the cracks, bumps and holes in the wood. Let it sit for a few minutes and then wipe it away. Sand down any thick paint spots and then brush on one coat of a water-based polyurethane. We recommend water-based because it seals the wood and because it doesn’t alter the color of the wood. Just to prove it to you, take a look at our fake barn wood next to the real thing:
 
 
Pretty close, wouldn’t you say? We wanted it to look a bit more polished, but if you want a more rustic look, you can sand it down even more to reveal the wood beneath. So, now you have no excuse not to bring some barn wood- real or not!-into your homes!
 
 
Finally, here’s a teeny glimpse into the projects you can find on our blog. We did a fun room makeover for a friend, totally renovated a kitchen, added some style to the outside of our houses, and had came up with lots of cheap photo display options! (You can click on each pic to see the full post)


Thanks so much for having us, Kim! This was so much fun!
jess&Monica

Join Sand & Sisal on FACEBOOK, TWITTER, PINTEREST, G+ or SUBSCRIBE.

 
« Summer Blogger Blitz: Four Generations One Roof
Summer Blogger Blitz: White House Black Shutters »

Comments

  1. Four Marrs and One Venus says

    July 24, 2012 at 5:26 pm

    OK. I don’t know what to say!? It’s like you KNOW what my Next project is… and this could not have come at a better time! My Gosh! You girls are like my crazy inspiration.. seriously!! Love that wood look… stunning. And you betcha I will be using that Technique in my next project! Gosh you two are Good! Good I tell ya!

  2. Jessica Bruno says

    July 26, 2012 at 12:33 pm

    I love anything that has the words “barn” and “wood” 🙂 Your shelf came out great and looks gorgeous with the seating area 🙂

Welcome

Kim WilsonWelcome to Sand & Sisal: where love of home and sea meet! I share tutorials in DIY, decorating, crafts, gardening, & recipes.  [READ MORE]

Let’s Connect

  • Facebook
  • Instagram
  • Pinterest
  • Twitter
  • YouTube

Keep in Touch!

Love this post? Let's keep in touch!

Subscribe for free to have Sand and Sisal delivered straight to your inbox.

Search

Categories

Archives

Copyrighted Content Permission

All images and tutorials on this blog are copyrighted material. Please contact me if you would like to use any media (photos, video or audio files), tutorials, or ideas from this blog. 99% of the time I would be happy to allow you to use ONE photo with appropriate credit and link back to Sandandsisal.com (preferably to the same post it was borrowed from.) Absolutely no text or tutorials can be replicated. Contact Kim via email: sandandsisal (@) gmail (dot) com

Amazon Associates Disclosure

Kim Wilson is a participant in the Amazon Services LLC Associates Program, an affiliate advertising program designed to provide a means for sites to earn advertising fees by advertising and linking to amazon.com.

Privacy Policy

Click HERE to review our Privacy Policy

Copyright © 2025 · captivating theme by Restored 316