Cue music: The hills are alive with the sound of music! (sung in the best Julie Andrews impression I can manage).
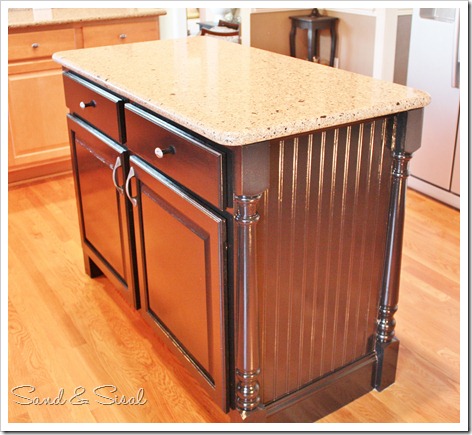
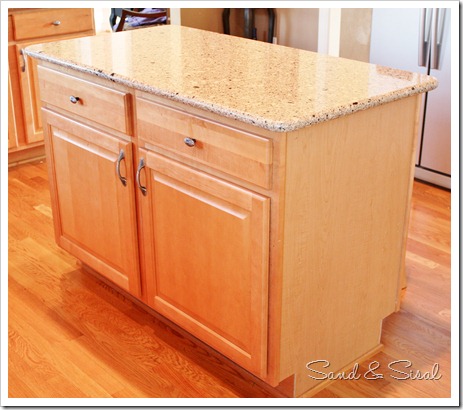
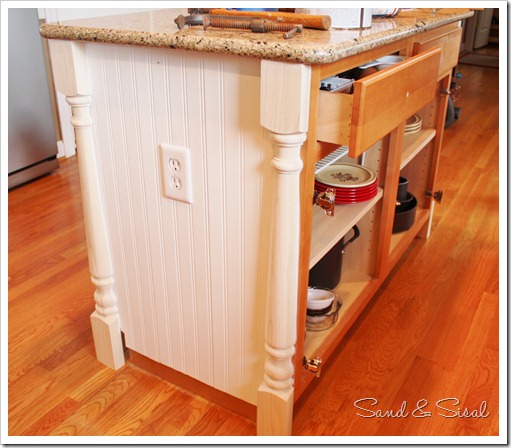
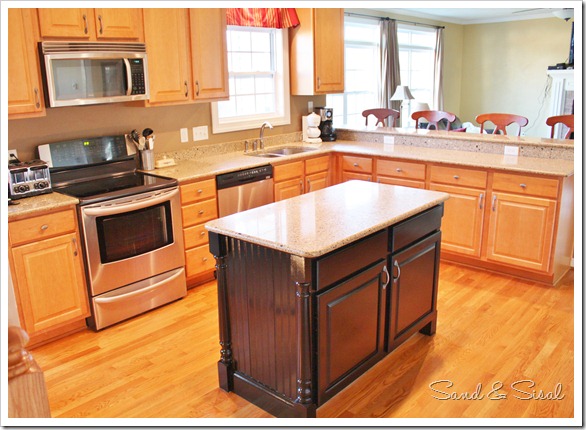
The oh-so-ugly, boring builder grade island has had its makeover and is ready to make its debut!
Remember the before?
I took all your advice and suggestions from the Island Ideas post on how to spruce up the island and applied it. Thank you for your input!
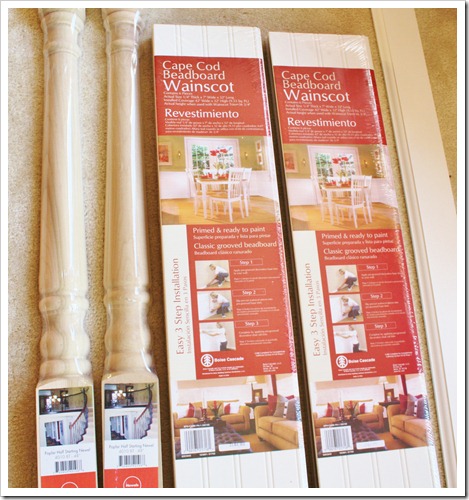
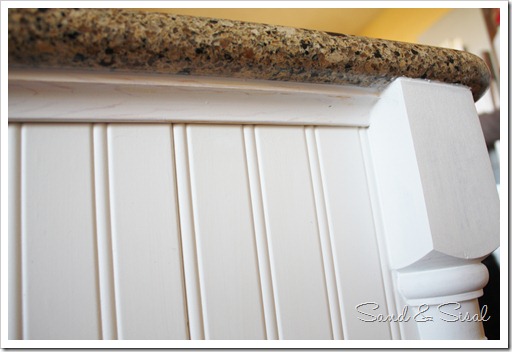
Home Depot supplied the half newel posts, and bead board wainscot. I only used 1 package of wainscot and 4 newel half posts.
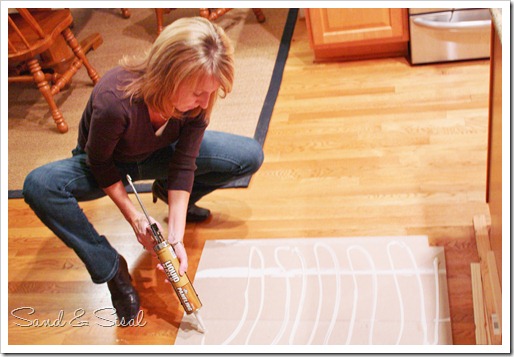
After connecting 3 sections of bead board together I liberally applied Liquid Nails and then pressed it onto the side of the island
and taped it with painters tape to secure the board in place while it set up.
**For all who ask, YES, I usually wear heels, dress jeans, nice clothes, etc. while I DIY.
And YES it drives my family nuts, and YES I mess up my clothes sometimes, but that’s just the way I roll.**
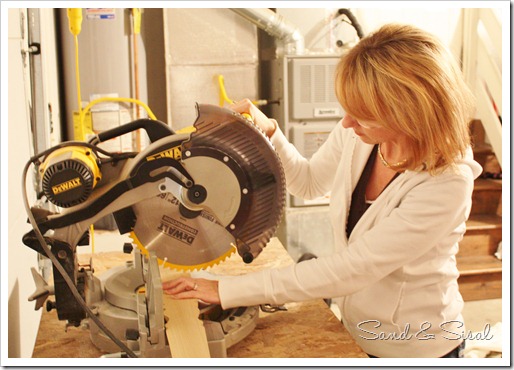
While waiting for the Liquid Nails to set up, I measured the height from the floor to under the counter
and trimmed the half newel posts to that measurement. **Always wear your safety glasses.**
The Liquid Nails was applied to the back of the newel posts, pressed into place, secured with painters tape and allowed to set up overnight.
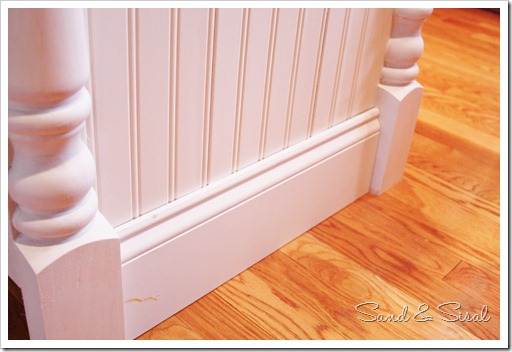
I added pre-primed 6 inch baseboard and nail gunned it into place.
A strip of cove molding was also added and nailed into place to give a more finished look under the counter.
All seams were caulked with white, paintable caulk and then the entire island was primed with Kilz.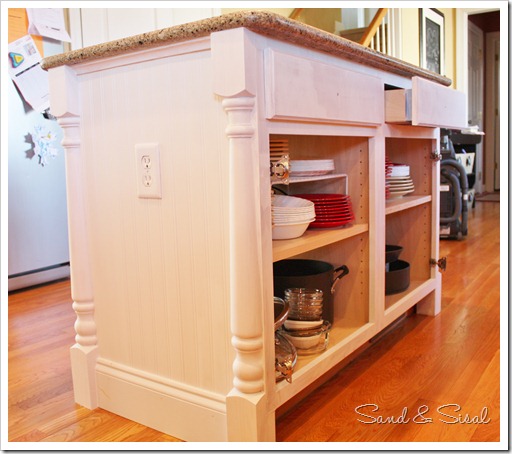
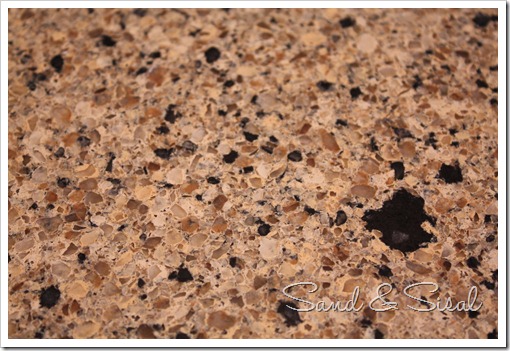
The countertop is this wonderful product called Cambria, “Victoria”. It is natural quartz and I LOVE IT!!!
I chose to bring out the black accent in the Cambria so I painted the island black.
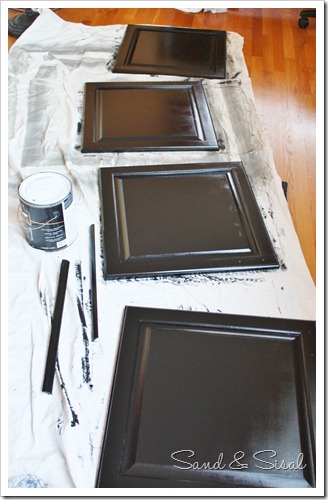
The floors were taped off and the island received 2 coats (brushed on) of a high gloss enamel then one coat of semi-gloss poly-crylic.
If I had to do this over I would choose a satin sheen vs. the high gloss enamel.
The same went with the cupboard doors, but that paint was applied using a smooth sponge roller.
And everything was given a light sanding between coats of paint with a superfine sanding block.
I’m pleased with the results and surprised at how adding simple moldings can richly improve appearances.
Thank you dear friends for all your suggestions! I hope you like the results as much as I do!
Kim
Linking up to:
 |
 |
 |
 |
 |
 |
 |

Awsome Kim! What a transformation, it looks very custom and not builder grade at all! And hey no one says we have to look like construction works when we DIY!
this came out beautiful! I am cracking up at the heels and jeans picture and also the saw. I’d be petrified! I’d love to put this up in our powder room but I don’t know if I could do it.
Looks great! Now time to paint the rest of your kitchen!
Nice job, looks great!
LOVE this! Come link up at
elements-interiors.net
xoxokara
Wow!! Don’t know what I like better, you’re outfit & heels or the island?? Little bit envious of both..ha ha! GREAT job, looks AMAZING!! Kim B.
Kim,
It looks AMAZING! I’m sure you want to just keep staring at it! More reason to be in the kitchen:)
Beautiful job. Love it
Looks great! Love the black!!
WOW, it looks FABULOUS!!! I am so inspired to transform our island now. Thank you for posting every step of how you did it – you rock 🙂
And I love that you DIY in your good clothes – I do too – who has time to go change into scrubby clothes anyways!?
~Erin
Very impressive. I love a woman who can handle power tools and make it look easy!
Fabulous! Great job!
The Lazy Mom
http://www.imalazymom.com
It is beautiful! You did such a great job!
Kim! You are absolutely amazing!!! Hot mama, in heels, working with power tools!!! Wow!!! Your husband is a lucky man!!! lol I really love the transformation!!! It looks AMAZING!!!
I gotta admit, you really do what you set your mind to!!! I have so much to learn from you!!!
Thanks so much for the detailed pics! SOOO helpful!!!
xoxo
Fantastic Job!! Love the new look,I plan on doing almost the same thing to my island. I love it when the island is a different color from the rest of the kitchen and you really gave yours a custom look! Would love if you stopped by my blog for a look. Martina
I have to say that is pretty amazing!
I love that the island makes more of a statement now with the added trim. It looks wonderful.
Came out great!!!
Beautiful! I want an island just so I can fancy it up like yours!
Stunning! What a great job! I love the quartz, beautiful touch.
Kim, what a diyer you are. I love it. You can handle those power tools like a man. The job you did looks professional. Would love for you to share this at my new wow us Wednesdays party that is still going. This is great!!
This turned our just beautiful. Great job.
Kim…
You did an excellent job! Added charm with your magic touch!
*Lynne*
Oh my, this is fabulous!
The results are stunning!
Thanks for linking!
XO
that is an amazing transformation!! Great DIY skills girl!
I love it, you did a great job !
It looks really great. I wish an island would fit in our kitchen.
I was writing to say you totally inspired me!! I bought the supplies at home depot yesterday for this makeover! Over the next few weeks my kitchen is getting new paint, a back splash and an island update!!
Love your blog! I’ll show picture to you when it’s done.
Have a great weekend.
WOW! Incredible transformation! Love, love love it! Miki
It looks amazing! I love when islands are a different finish!
Your island looks amazing! I was impressed with you working that saw 🙂 The added architectural elements really make it unique. Great work!
I just found your blog and am in love with your island transformation. I have an island that appears to be almost identical in size and would love to transform it. I am curious, what is the overhang of your countertop, especially on the ends where you added the posts? I am trying to figure out if mine will accomodate the newel posts.
Thanks in advance and keep the great tutorials coming!
Thank you everyone! To answer Jennybug’s question. The countertop overhang is 2″ and the newel posts are HALF newels and are only 1.5″ thick. Hope that helps you! 🙂
Your island looks great. The beadboard and newels gave it a whole new look. Love your counter selection also.
Dropping by from How To’s Day. Hope you’ll come see DD2’s picture wall we did for her.
Allison
Atticmag
We have a very similar sized island and all the “spruced up” islands we’ve looked up have been monstrously large. Thanks for the ideas and the advice on the finish. We want to try it in teal/aqua but might be too scared…
Okay so all your supplies came from Home Depot? Are the newel posts just their standard half ones? Can you tell me more about them? We are trying to do the same to our island and a guy quoted us $560 to do EXACTLY what you just did, and then called back to say he was having a hard time “notching” out the newel posts! We can do this and hopefully SAVE a TON! Any more info would be GREAT!!!
Lukeymom- I’d love to address your questions, the best I can. Could you send me your email address? Thanks!
Hi, the island looks Fabulous. What color is on your kitchen walls?
The paint color under the cabinets is “Meadowlark” and the color on the walls in the family room in the background is “Restrained Gold”, both by Sherwin Williams.
Looks Fabulous!
I feature great projects from around blog land, I would be SO happy if you would consider writing a special guest post about this project for my blog Remodelaholic. Please let me know if you are interested, and I will send you the details!
Thanks,
Cassity
Hi Kim, I loved your island sooo much , that My husband and I went out and bought all the supplies to do ours the same way! Is there any way you could post a pic of the back of your island? It would be very helpful. Thanks, Rosann
Hi Kim, I loved your island sooo much , that My husband and I went out and bought all the supplies to do ours the same way! Is there any way you could post a pic of the back of your island? It would be very helpful. Thanks, Rosann
I love this island!!! I want to do this in my kitchen!!!
Wow! You’re the smartest one and your island turned out beautifully! Look at your big tools – that saw! Oh, my goodness – you really know what you’re doing! You did a wonderful job and I love your kitchen!
Be a sweetie,
Shelia 😉
I love this! We are totally going to try it too. I’d also love to see a shot of the back. We are very, very new to the DIY world! Thanks!
Thanks Megan! The pic at the top of the post is the front and the pic at the bottom of post is of the back. Both sides are identical. 😉
This looks great! What did you do to the back side of the island?
Thanks Dianne!The top picture is the front and the bottom picture is of the back. Both sides are identical. 😉
Oh I see now! My island is identical to yours except it only has doors on one side. So I guess I could just wainscot the backside. Thanks!
Kim, how did you deal with the electrical outlet on the one end? Did you replace it with a black one? I know I’ll be doing this project in my new kitchen and am considering red. I’m decorating with vintage farm accessories and have a collection of chickens which naturally brings a little bit of red into the space. The wall color is very similar to yours. I’d love to hear your thoughts on my proposed color scheme.
This is simply genius! We are about to do our kitchen island and I am doing it ….exactly…..like ……..this. Thank you so much for posting your step by step instructions!
Beautiful makeover – your island looks gorgeous! I have this linked to my kitchen islands post as well today, for inspiration!
great job
How did you get the posts to sit flush against the cabinet frame edge, doesn’t the 1/4″ thick beadboard push the post out?
No they don’t. Our cabinet edge frame stuck out about an 1/8 of an inch so when we applied the bead board to the ends (between the end frame corners)it ended up being totally flush. Then we just aligned the half newel posts on the corners and caulked the edges.
Love the island! We are redoing ours now thanks to you. We followed your steps very closely. Question, do you remember the color you used to paint the cabinets? We have a similar setup with the maple cabinets and I like how your island is a different color. Thank you!
Thank you! It was black by Olympic. I don’t recommend it though. I should have spent the money and purchased something better from Sherwin Williams or Benjamin Moore. The higher quality paint is not only easier to work with, but will also stand up to time.
So doing this!! I love the way it makes the island look more like a piece of furniture! You did a great job! My kitchen is a work in progress, let me rephrase that….My kitchen will always be a work in progress!! Pinning it!
Thank you!
Hi Kim, I just happily stumbled across your blog. We are in the process of remodeling our kitchen. I actually have the posts purchased and my husband made his own bead board from oak to match the wood on the existing cabinets. So funny I thought my idea to paint the cabinets and island different colors was unique. We had a two tier island and have made it one level. I plan to paint the island black and the remaining kitchen cabinets off white with a black stain in the groves. My questions for you are did you sand the cabinet and prime it before you painted? Can you still see the wood grain on the cabinet and doors once they were painted? I am pretty sure we have the Olympic paint from Home depot too. My husband built additional cabinets for the side of the island where the bar stools originally sat so now I have additional storage for my mixer. Thanks in advance for your input…
Paige
Paigegathome@yahoo.com
I too am looking to do my island and want to know more details on the half newels. Can’t find them at our Home Depot. Do you have a number or more information and what is the price point?
Thank you!
I found the same posts in our Home Depot in CA but they were on clearance. I paid $17.00 for each one and had to go to two stores to find four.
how do you do the beadboard around the outlet? im going to do my island all by myself and need to know it’s pretty easy..lol
I’m sorry I missed this question earlier. You need to measure and find where the exact location of your outlet will be on the beadboard. Then draw a rectangle the size of the receptical on the beadboard (take off the faceplate). Drill several holes along your pencil lines and cut out the rectange with a small hand saw or you can use a very sharp box cutter even, just be careful.
Kim,
Looks really nice. We’re in the process of doing a very similar job. Few questions:
1. Did you paint the inside of your doors or just the fronts?
2. Not sure what “ename”l and “poly acrylic enamel” are? Are they oil based paint?
3. Did you sand or prep the cabinets before you primed?
Thanks for you help – Renee
Hi Renee,
Thank you! Yes, we painted the insides of the doors. Enamel is just a type of paint that hardens nicely. I used an enamel from Olympic paint which was water based, and to be honest, next time I would use a higher quality paint, like from Benjamin Moore or Sherwin Williams. Poly-crylic is a clear, water based protective coating that you paint on afterwards. We lightly sanded and then primed. Hope that helps. 😉
Kim,
What did you do across the back of the cabinet. Did you wainscott to it also? I have the exact same cabinet. Have bought the wainscott, but can’t find the same posts you used.
Hi Cheli!
Here is the link to the half newel posts we bought from Home Depot. I’ve seen them at ever HD I’ve been too. Ask the peeps there. They just might have been sold out: http://www.homedepot.com/p/Unbranded-48-in-x-3-in-Unfinished-Poplar-Ball-Top-Half-Starting-Newel-PO4010BT48HALF/202057726?keyword=half+newel+posts
Sorry Kim, I read back into your comments and see that you have doors on both sides. I don’t. Guess I’ll go with wainscotting it to match the sides.
I am using chalk paint on my island.I noticed you painted the bead board and posts after you put them on. Would it be easier to do it before? Also why did you use Kilz? Do the posts come in different sizes. I have a pretty big island, should I use a bigger post? It looks great. Thanks a lot. You are an inspiration
Hi Diane,
I just used Kilz, because it was a good primer that I already had on hand and I had written this post years before I had discovered chalk paint. I still would paint the posts and bead board afterwards, because you will want to caulk any edges. The posts are a standard size, made for staircases. But you can always research trying to find larger ones at a specialty wood or cabinet making factory.
Hope that helps! 😉
~KIM
Kim,
We’ve purchased the materials but are wondering how far past the edge you put the Newell posts? Also, what is the thickness of the baseboard you used? Love the transformation!
Thanks!
Hi Kim,
Love the island! We are getting ready to do this idea to our own Island but we wondered how far you put the newel posts to the edge to give it the depth and dimensions seen in the picture. Plus, what is the thickness of the baseboard?
Thanks!
Hi Penny!
The baseboard is 1/2″ thick and 5.5″ tall. The half newel posts are flush with the edge of the island.
Thanks!
KIM
Thank you! My husband wondered if you could take a photo of the back side of the island and send it to me. You have photos of every side except the side facing out towards the room. Our island is “L” shaped so we figured on using 5 newel posts, which I had to order on ebay.
Hi Penny,
Actually everyside is shown in the pics. Both sides are identical.
Pic #1 (island cupboards facing the oven) is of the front and right side.
Pic #6 (with the outlet) is of the front and the left side.
Last Pic (island cupboards facing fridge) is the back of the island.
I bought all of my half-newel posts (not full newels) all from Home Depot. I’m pretty sure Lowes carries them also.
Hope that helps. Best of luck to you on your island! 😉