I’m hot on copper this week! Last time we talked all about how Copper is becoming a new metal trend of choice for accessories, fixtures, and architectural elements like countertops and even flooring! I’ve been fan of copper ever since I was a child. I remember my mom going to Copper Craft parties with her friends. Does anyone else remember that? Those were the days of Princess Diana wedding and Duran Duran… oh my, I’m giving away my age!. Copper Craft focused on pots, pans, and jewelry. Everyone had some piece of copper back then. Well, copper has gone upscale and made it’s way to the forefront of design. If copper is not in your decorating budget right now don’t worry! Today I want to show you how to get the look of copper for less.

When we moved into this home four years ago, the front door lantern lights had a pretty coppery glow that complemented the copper colored brick siding. So when we installed the privacy fence, we opted for real copper capped fence posts. I think we have 10 copper capped posts along the property. They look just beautiful and shine brilliantly in the sun.
")
Then I came across this beautiful mailbox in Grandin Road. My heart went pitter-pat when I saw it! But the $300 price tag didn’t enthrall me. Most of the homes in my hood have expensive custom brick mailbox structures. Well, I’m not one of those lucky ones….
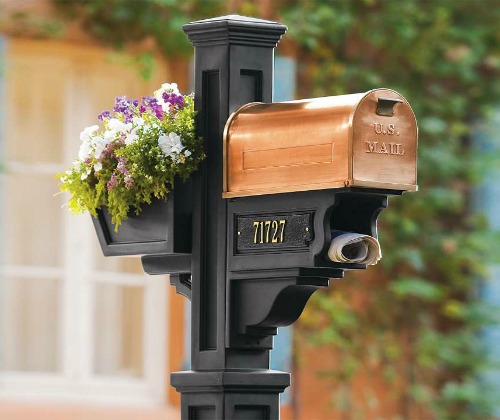
This is my sorry mailbox. He’s sad isn’t he? He’s faded. He doesn’t match the house at all. He has iron rust stains on his post from the sprinkler’s well water. The neighborhood dogs anoint him everyday. He’s been kicked down and abused by a few episodes of rowdy teenage angst. He falls off his post almost every time the mailman opens his box (because no screws hold him down…my mailman hates me). His door falls open with the slightest wind.
Ok, HE’S PATHETICALLY DULL. Time for a MAKEOVER!
")
He deserved an upgrade. So we knocked out the dents, tightened the door and gave him a new look. I wanted the bright and fresh glow of new copper. I chose Rust-Oleum Metallic Spray in Copper.

Ta-da! Black satin exterior paint coated and covered the rusty looking white post and the metal mailbox received its beautiful coat of copper! The astaic lily plants were spruced up with bright yellow pansies and coppery mums. For less than $20 I was able to greatly boost the curb appeal of my corner.

Remember those coppery lanterns I mentioned before? Well after four years, they’d lost their coppery glow and I realized they weren’t copper at all but just painted to look like it. By now the paint was faded and the raw, silver metal was exposed and they looked just plain ugly. I think the southern lantern fixture is appropriate for this home so I knew a quick fix with paint was the solution. I taped off the brick and glass and spray painted them with the same copper paint.

This is how they looked before….. blah, blah, boring….
")
And now…. bada-bing! Yah baby! It’s a bit flashy I’ll admit, but I like flashy! I know it’ll fade and mellow over time too (everything does), so no worries. Goodness, it’s just spray paint. If I get sick of it, I’ll paint it something else. Nothing is permanent right? Go with the flow. Regardless, it’s a great look for fall.
")
We have the same lantern fixture over the garage on the other side of the house, and back in June I experimented using a different type of copper paint.

I painted the garage lantern with Martha Stewart Copper Liquid Gilding which the wonderful crew at Martha Stewart Crafts had sent me to try out in the early spring. I applied the copper gilding using a flat tipped, 1/2 inch wide paint brush. It copper gilding has actual copper in it! The gilding is thin and watery but coats the surface well. A tiny amount goes a very long way. When dry, the gilding was just as bright and shiny as the spray paint, but because it has actual copper in it, the gilding will develop a patina over time.

It took about four months for the patina to darken. This is what it looks like today. The lantern is looking more like aged copper, but I’m not sure which look I actually prefer… shiny or aged. I’m torn.
")
Here is how the front of the home looks with it’s splash of coppery bling.
")
I still might age the copper with a bit of Rub n’ Buff in copper green, but we’ll see. Right now I’m enjoying the look for autumn. You can easily choose black, oil rubbed bronze, brushed nickel or any other metallic color you desire to make over your mailbox and exterior light fixtures. A $5 can of spray paint is much more affordable then brand new fixtures! With these tips you can pinch those pennies, extend the life of your belongings, and make your home look fabulous too!
Kim
Related Posts
How to Polish Copper DIY Copper Mobile Hot Design Trend: Copper
 |
 |
 |
Join me on FACEBOOK, TWITTER, PINTEREST, G+ or SUBSCRIBE.
disclosure: this post may contain affiliate links
Linking up to: Today’s Creative Blog, Craft-o-Maniac Monday
Love all of it!!! Looks great.
I love the shiny, new copper look, but I also like the greenish patina it develops as it ages. At this point in time, I think I’m leaning toward the shiny glow. 🙂
I think the bright copper looks great – what a nice and inexpensive upgrade! You could also add your house numbers in a pretty font on the mailbox…just a thought. Nice job!
I did add the numbers to the opposite side of the mailbox post. They look great too! But for security reasons I don’t my address on the blog. Thank you for the compliment! 😉
Love your ideas! Love the copper mailbox I was thnking those river rocks would also look nice around the mailbox. 🙂
I like copper too, but we don’t have anything with it in or around our house. Your house looks very big, I never noticed that you lived in such a big house when I read your blog.
Jule from inside 9B
It’s a pretty big house. There are 6 of us and it’s more space than we need but we were able to purchase it at a great deal because it was a foreclosure, so I feel very blessed. Thanks so much. 😉
Wow! Who needs Grandin Road? Everything looks really beautiful! I bet it makes you happy every time you drive up! :)Meghan
So pretty Kim! I love copper too! Your mailbox looks so amazing and I’m loving your lanterns! You always amaze me! Thanks for the inspiration Kim.
Love the updates – especially the mailbox. It’s amazing what a few coats of spray paint can do!
Amazing! Love it, Kim! <3 Heidi Rew
Oh my goodness! It all looks so fabulous…the mailbox, oh my! I love it. Great makeovers Kim.
Heather
Beautiful….love copper accents on homes…We had copper flashing put in some areas around the roof and I love the way it ages…such great patina…The copper painted finishes you added to the lights and the mailbox turned out fantastic…you have such great curb appeal!
AH-MAZING!! I have to be honest here & admit I never gave copper a 2nd look, must be that non-diyer in me 🙂 I am SO enjoying these posts & LOVE how you’ve sooo inexpensively transformed your home ala copper! I have a confession too…while sitting with a crafty diyer at a football game I started sharing some of your ideas & of course she just thought I was all that. Knowing I wasn’t being honest, I pulled up your blog on my phone along with your pinterest & BLEW her away 🙂 She LOVED all you’ve done!
Beautiful updates Kim!! I love both looks, the shiny and the aged. I think the shiny is perfect for the front of your house, the aged might blend too much with your brick.
My husband built me a pot and utinsil 25 years ago out of copper pipe and it still looks great.
Does anyone know if this paint actually contains copper? I’m looking for something to paint garden pots with to deter slugs. If you put a piece of copper tape or pennies around the pot, the slugs will not cross it. Wondering if this would work.
The Martha Stewart gilding paint contains copper. I’ve heard about the penny trick for slugs too, though I haven’t tried it yet. I think adding a few pennies around the soil is a cheap deterrent too.
What a really nice change, Kim! My electrician applauded me when I told him I’d be painting my fixtures, as opposed to replacing them. Mine have faded to red/orange and are awful. Never thought of copper paint- I was shooting for my tried and true ORB! after seeing your MStewart lantern, I think I will try this.. 🙂 Sue
What a great difference you made for such a small amount of money and time! Love it!
It looks really great!!
Love the cooper. I too have painted the fixtures both outside and inside. After I paint them I spray a coat or two of matte clear and they haven’t rusted yet. It’s been 2 years. I look forward to seeing more of your creativity. Thanks, Kim
Kim,
This is such a wonderful idea! I love the whole not-taking-down the light fixtures, just paint in place. Very time efficient! My house is old colonial style and the outdoor light fixtures were bright brass- 25 yrs ago! This will be our fall project as soon as the exterior has been washed down! Thank you!
Now – what color….hmmm. Maybe black – maybe. 🙂