 Glass and stone tile are all the rage right now in bathroom design. The sparkle of clear watery glass and the organic warmth of stone is a favorite combination amongst designers and homeowners alike.

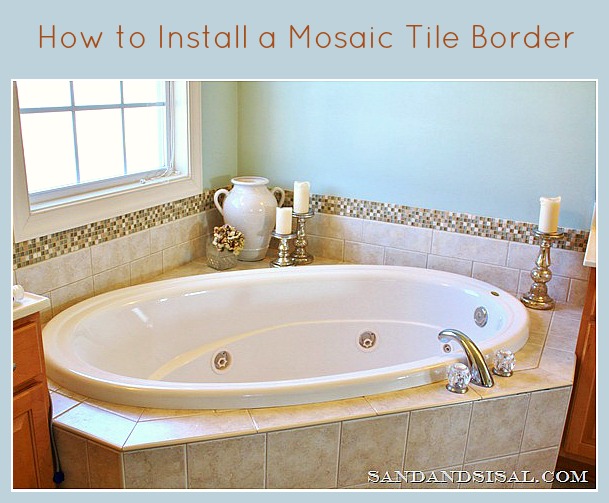
The master bathroom in our home is phenomenal in my humble opinion, but it did lack detail. Adding a decorative tile border is an easy project that delivers a big impact. Below is a pic of my master bath. I adore that Jacuzzi tub but it needed a bit of bling!

Lowe’s has a nice selection of stock 12×12 glass mosaic tile. This particular one is called “Seabreeze”.

To save a ton of money on premade borders, cut the 12×12 mosaic into strips. Peel off the spongy backing.


I then applied prepared white thin-set to the back of the border with a trowel. This method is kind of backwards, normally you apply the thin-set to the wall but a tiling friend of mine suggested just “buttering” the tile for small projects. Getting the appropriate amount of thin-set on the tile is a bit of trial and error. You do not want the thin-set to ooze to the surface of the tiles but to stay half way back. If you apply too much, then just remove it with a thin screwdriver or skewer.

I rested the tile border above the existing tile, pressed it firmly, and wiped off any extra “ooze”. Below is a pic of the border tile without any grout. It only took a few hours to put on the tile. Allow it to cure for 6-24 hours, depending on how large your project is. Follow the adhesive manufactures recommendation. Mine recommend 6 hours.

Now it is time for grout! I chose a sanded grout in a linen color. Why a sanded grout and not the non-sanded kind you ask? The non-sanded grout will stick in all the knooks and crannies of your stone tiles and will not come out, resulting in an ugly finish. DO NOT WORRY ABOUT SCRATCHING THE GLASS! I can not scream this loud enough. It is so hard to scratch those tiny glass tiles. If you are using purely glass mosaic tiles, then yes, use a non-sanded grout, but when using the combination of stone and sand, trust me, you’ll be happy you used sanded grout.
Ok, go ahead and scoop out a big blob on your rubber float.

Apply the grout to your tile with a 45 degree angle. Don’t worry about this part, just slather and work it into the grooves. Wipe off excess with your float on the 45 degree angle. Then take a big grouting sponge, get it wet, and with circular motions rub off all excess from the surface and edges. In about 4 hours you can buff the haze off the surface with a dry soft towel.


Below left is a close up of the tile grouted and dry. And below right is my view from inside the tub. Yes, I had to lay down in it to experience the full effect !!!


This project cost $50 for the tile and supplies.
The results are amazing and I’m loving how it blends so well with my bathroom colors of Rainwashed and Urban Putty by Sherwin Williams.
I will be adding this above the shower tile also this week.
Click here to see the color inspiration for this master bath and bedroom.

Have you tiled before? I’d love to hear about it! Feel free to leave a comment and give me what you think!
Kim
Kim that looks fantastic! I love how you accessorized too. Great job, Martina
I have to tell you that you give the best tutorials. I follow 20 blogs daily and have for years, yet yours is the first one that gives me the confidence to try new things. Thanks, Deb
Wow! Deborah I wish I had your profile to respond to you by email, but thank you so very much!!
That looks great!!
I LOVE it! I’ll be linking you up to “the other blog” scheduled to post in a few weeks.
Looks outstanding…great colors! I’m having a GIVEAWAY…so hop and enter to WIN!
Blessings,
Linda
Kim you so inspire me girlfriend! It is amazing that a small amount of tile and work created such a HUGE impact!! Keep the blogs coming!!
Kim-
Just a thought…I did not think you are suppose to use a sanded grout on glass tiles? Did the sand not scratch the finish? Let me know your thoughts…
XOXO
Scratch? It hasn’t been my experience yet. I could see how using sanded grout on a larger type of tile such as 1.5 x1.5″ or subway could possibly be scratched if you rub hard, but that would take some effort. Thanks for pointing out that possibility though.
Kim, what a difference that made just by adding those tiles. Thanks for joining WUW again!
Looks great!!
Happy Wednesday!! I am blog hopping today and decided to stop by your blog.
Please stop by and say hello and even become a follower (if you aren’t already) at either of my blogs:
So Stylilized is where I am currently offering FREE Custom Blog Designs at http://sostylilized.blogspot.com
Jessicas Lil Corner is where I blog about life and family at http://jessicaslilcorner.blogspot.com
Have a blessed Wednesday!! :0)
It looks great. I love the colors.
Beautiful tiles! They look perfect in your bathroom.
Love the way it turned out!! So pretty 🙂
Sooo pretty!! Looks like seaglass!! I am once again in awe that you did it yourself too. My self-esteem soars when I hang a picture, couldn’t even imagine doing tile,…ha ha 🙂 GREAT Job!!
That looks amazing! It makes a world of difference!
That looks great, what a perfect way to jazz up your bathroom.
That came out great!! Love it!!
Kim, this is amazing! Love the look! Love the price tag! Great job 😀
That is SO pretty and really “jazzes” up the tub area. I’ve never tiled before, but this doesn’t look too hard. Thanks for the tutorial!
that looks awesome! Really makes the bathroom look great and I remember seeing the framed mirror that I am definitely going to do in my own home in the future!
It looks great. I used the same tile and tiled my bathtub this past weekend. Thanks for sharing.
That is a great little touch! So pretty!
This is so beautiful! For such a little strip going around the wall, it makes a huge difference!!
PS: Today is the last day to enter my first ever giveaway on my blog, and I’d love if you’d stop by and enter! Check it out: http://mygirlishwhims.blogspot.com/2011/02/my-first-giveaway-and-introducing-your.html
I LOVE it Kim!!! It really brings your room together. You did a wonderful job!
I shared it on my TT&J facebook page 🙂
xoxoxoxox
Jen
Looks great! We did that same thing in the bathroom we finished in our basement; cutting those tiles from Lowe’s into strips and using them as the backsplash for the counter and a stripe through the shower tile. It makes them a lot more affordable!
Wow! That looks fabulous! I love glass tiles like that! We have similar colors in our bathroom, so I am tempted to run out and buy the exact same thing, seeing how good it looks! Great job!
It looks terrific! We just tiled our backsplash and had the same questions about sanded/unsanded grout and we were told for polished (glass, marble) tiled then unsanded grout is the way to go, but for the rest of them sanded is fine.
I love this idea for the bathroom tho because our master bath is uninspiring as well. We may have the same tiles as you. 🙂
What a difference adding that trim made and you didn’t have to demo anything first. Awesome!
came from tater tots and jello, love this project! what an impact! how much time did it take?
Madly in love with tile, can’t believe the whole project was $50!! I may or may not be at Lowe’s tomorrow morning 🙂
This looks so great. it looks like a very high end upgrade for only $50.
megan
craftycpa.blogspot.com
Wow, great idea! That looks fantastic.
Brittany
http://www.prettyhandygirl.com
The result is amazing! I also love how you accessorized the tub with the jar and shiny tall candlesticks!
Those tiles are just gorgeous! I linked this to my tile post today too, lovely!!
Kim, wear did you get the tile? I love how easy you made it . Could you use the same type of tile in the kitchen? Rena
The addition of the glass tiles is absolutely beautiful and is just enough to make a statement. I was thinking it would be great in my kitchen above the 4 inch granite backsplash. As trends go, if this ever goes out, it won’t be a major task to replace it. Thank you.
Very nice? How did you finish the top row of tiles? Did you grout at and angle to the wall?
I have just a standard tub (separate from the shower). No tile around it. I want to add border of the glass tiles around the top edge of the tub (so the tiles would be attached the to the drywall.)
I can’t find any tutorials on this. Could I follow the same basic steps that you did? Probably adding some silicone caulking around the the part where the tile meets the tub?
I’m not an expert by any means, but yes, I don’t see why not! 😉
That’s looking so pretty. That’s suitable for my bathroom. Thank you so much for this post…
Lovely tile!!!! That’s suitable my bathroom. Thanks for this post………….
Right here is where his heel turn goes into full swing.
is all business and no attachments.
Hi! I want to do this same thing, but border my huge wall rectangular mirror in the bathroom.. Do you use the same material to adhesive the tile to a mirror? If not, what kind do I use? Thanks!
THANKS so much for addressing which grout to use (sanded vs. unsanded) when your tile contains both stones and glass! I’ll stick with sanded as you did which is muuuuuch easier for my shower tiling project!