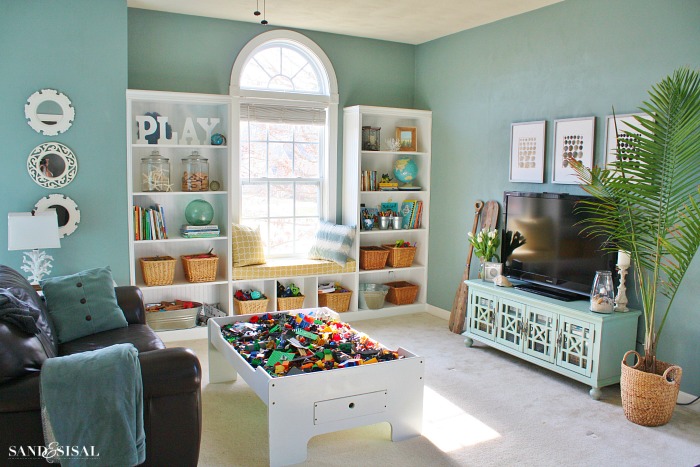
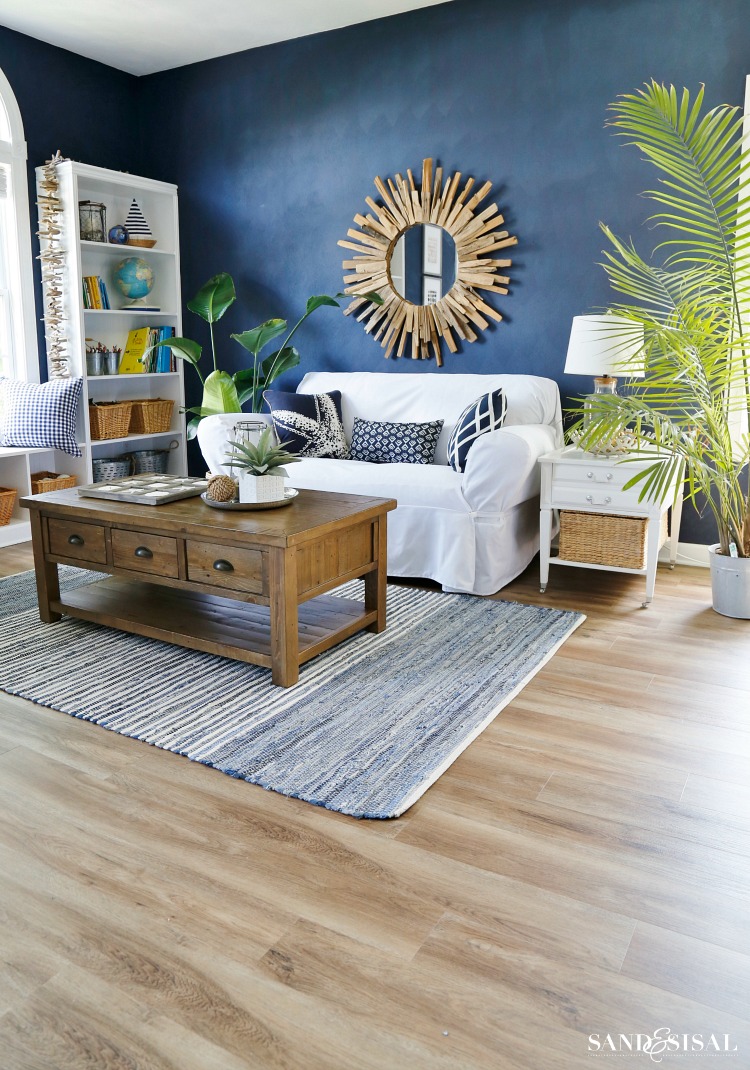
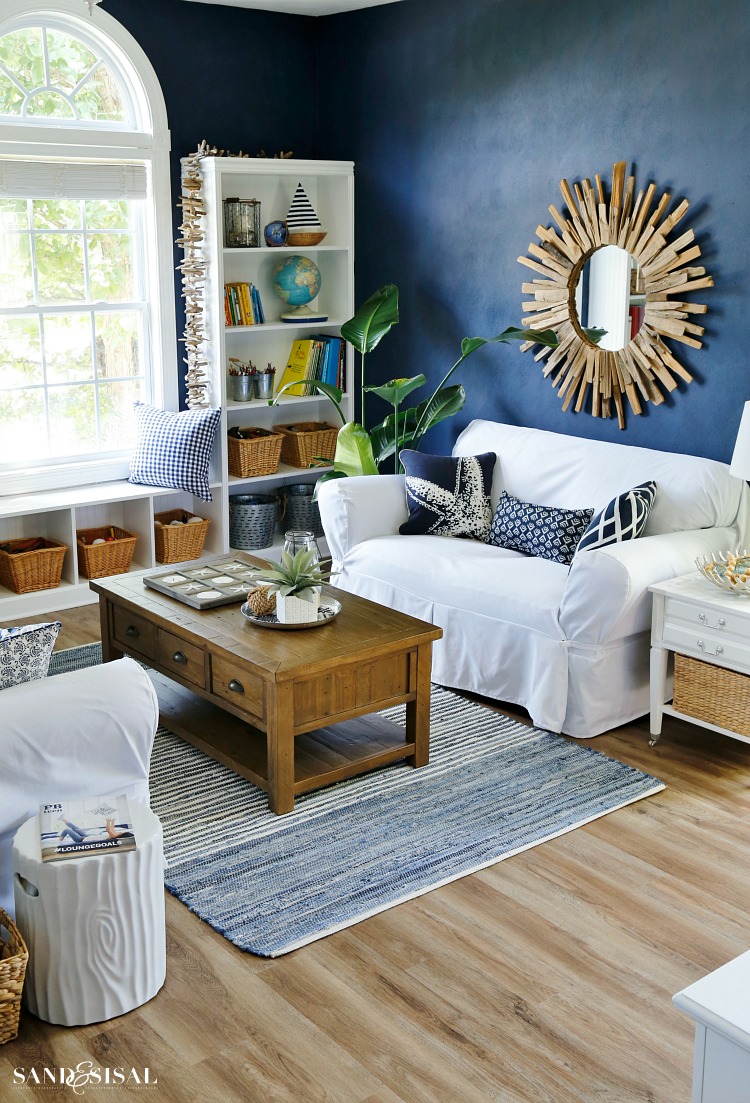
Thank you Floor & Decor for sponsoring this post! The opinions and text are all mine and I’m so excited to share our how we installed these gorgeous floors with you! I hope you all saw the huge changes we just made with our playroom, turning it into a more grown-up teen/family space. We are calling it a nautical media room complete with deep navy walls, bright white built-ins, sofas, and warm driftwood accents and gorgeous new flooring from Floor & Decor. The floors look fabulous don’t they? If you are considering replacing your flooring then this is the post for you! Today I’m happy to share How to Install Luxury Vinyl Plank Flooring. This flooring can transform your space.

This is a before pic of our playroom. The carpet looks clean here but it was taken several years ago. Well, years later, the carpet looked horrendous. 10 year old carpet is never a pretty thing. Allergies are a chronic problem too in our family and we are slowly trying to eliminate all wall-to-wall carpet to help alleviate allergy contagions.
We ripped out the carpet. Oh my, if you have ever ripped out old carpet you know how disgusting it can be. The dirt that settles down into the padding and then lower onto the subfloor is seriously amazing and shocking, hence why we want to remove all our carpet. Hubs can never handle looking at raw subflooring for any amount of time so he mopped the floor, allowed it to dry, then painted the subfloors with left over paint. That is why the pic below looks so bright and fresh.

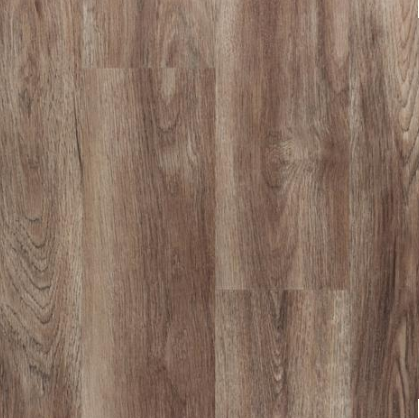
After our kitchen and family room flood, we were very interested in flooring that is not effected by water. Our tour of Floor & Decor opened our eyes to the vast array of flooring choices. Because the playroom/media room is next door to our laundry room, we thought a 100% waterproof flooring option would be best. We chose NuCORE luxury vinyl plank flooring available exclusively through Floor & Decor. The color is called Cheyenne. It has beautiful texture, gorgeous grain, and works well with a variety of wood tones, from light to dark.
NuCORE LUXURY Vinyl Plank Flooring:
- 100% waterproof
- 6.5 MM thick
- hypo-allergenic natural cork backing, resulting in a quieter and warmer floor
- no glue, nails, or underlayment needed
- durable, very scratch resistant, stain resistant
- no acclimation waiting period needed for installation
- feels like real wood
- extra rigid planks
- anti-microbial coating
- has a LIFETIME RESIDENTIAL WARRANTY/ 15 year commercial warranty
- easy to install. Score-Snap-Click-Tap! Floating installation.
- can be installed over most existing floors, subfloors, and irregular subfloors
- install up to 6500 square feet with no need for T-molding transitions
- easy to maintain – simply sweep or wet mop
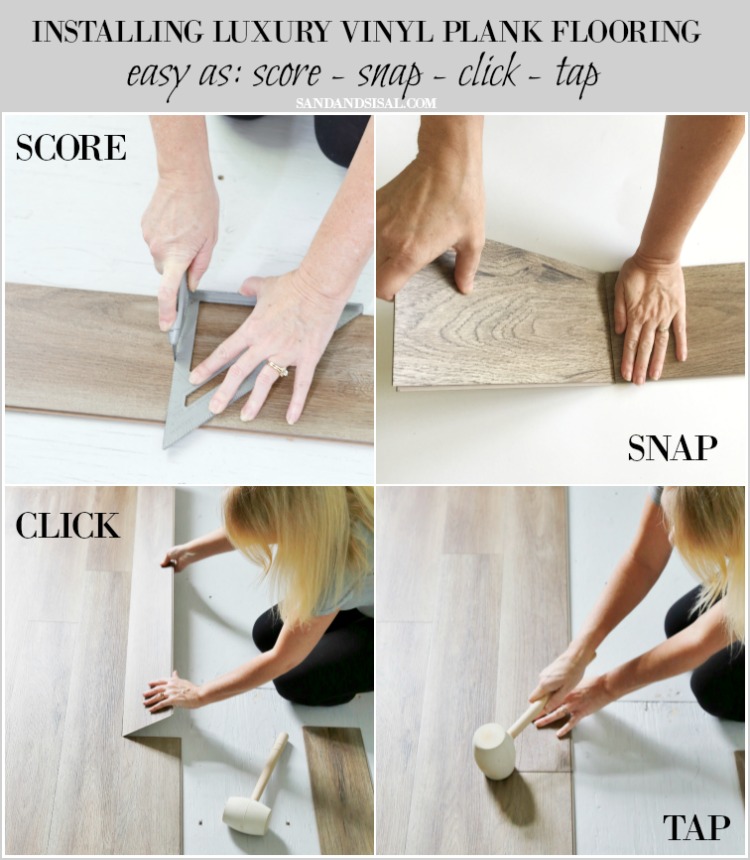
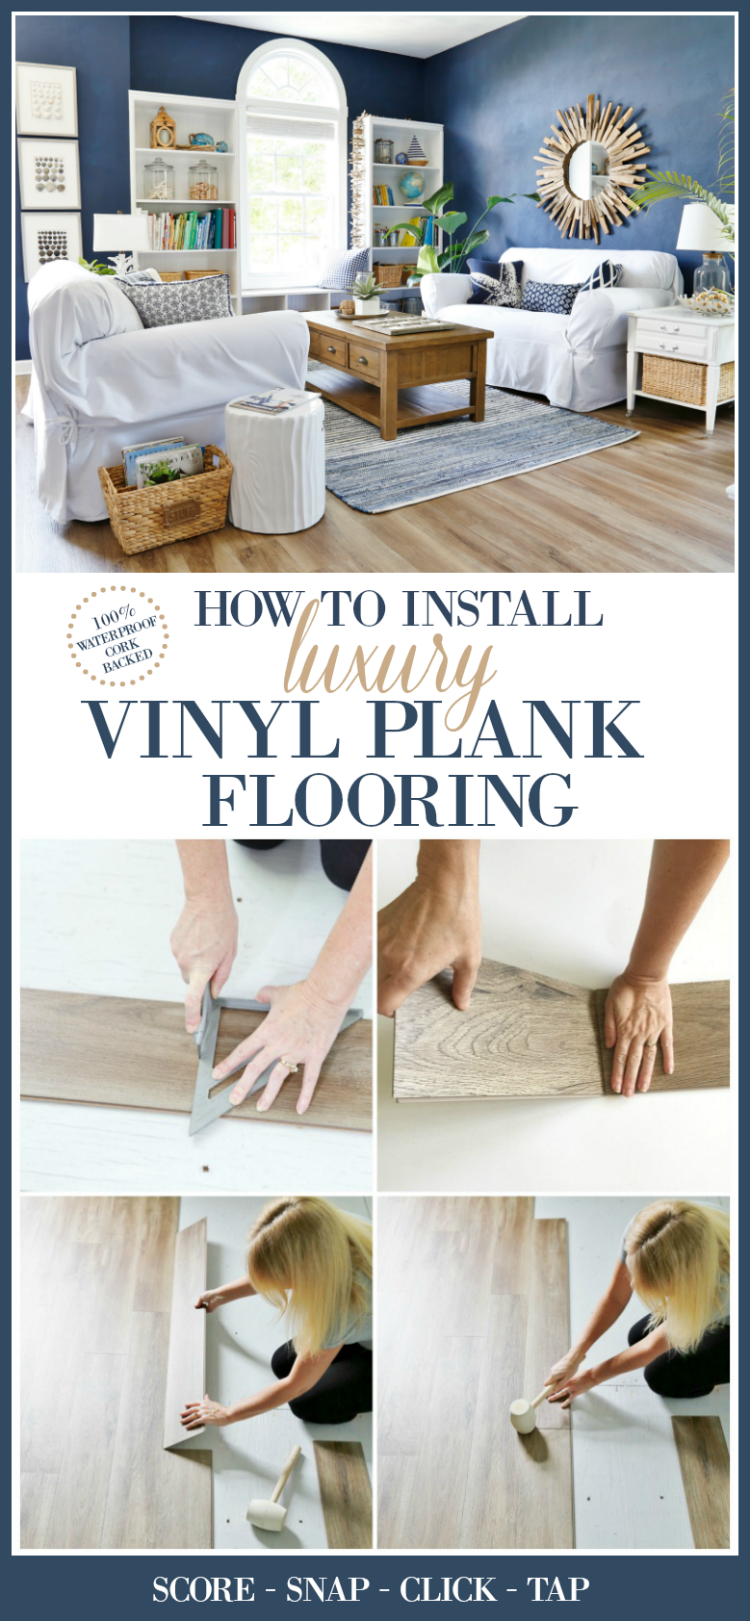
Installation is easy as SCORE – SNAP – CLICK – TAP!
To install NuCORE Luxury Vinyl Plank Flooring you will need the following items:
- box cutter
- triangle square
- rubber mallet
- measuring tape
- pencil
- spacers
- optional (oscillating saw)
Before Installation:
- Calculate the square footage of the area you want to cover. Floor & Decor has a handy calculation tool to help you figure out how much flooring is needed, depending on the flooring you choose. Add an extra 10% of flooring to account for cutting waste.
- Make sure subflooring is clean, dry and clear of any debris.
- Carefully read the installation instructions on the back of the flooring box.
How to Install Luxury Vinyl Plank Flooring:
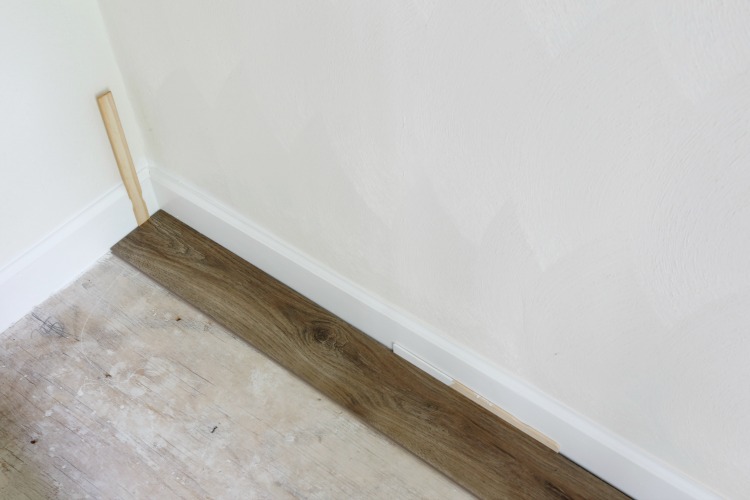
- Start laying a full vinyl plank in the left hand corner of the room. We chose to start in the room’s closet. Place the luxury vinyl plank 1/4″ from the left wall and use spacers between the wall and the planks. We used thick paint sticks.
- Drop the next plank into place, snuggly and securely pressing towards the left plank. Gently lower and allow the plank to CLICK into place.
- TAP seam to level with a rubber mallet.
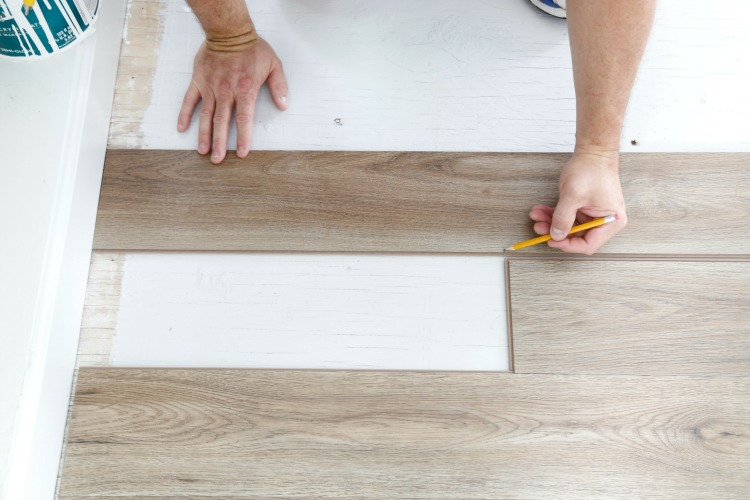
- At the end of the first row you want to leave an expansion gap of 1/4″. This is a super cool trick for all end pieces that will automatically give you a 1/4″ expansion space… Take a new plank, turn it completely around and butt it up against the wall next to the adjoining plank. Mark with a pencil where the 2 planks meet.
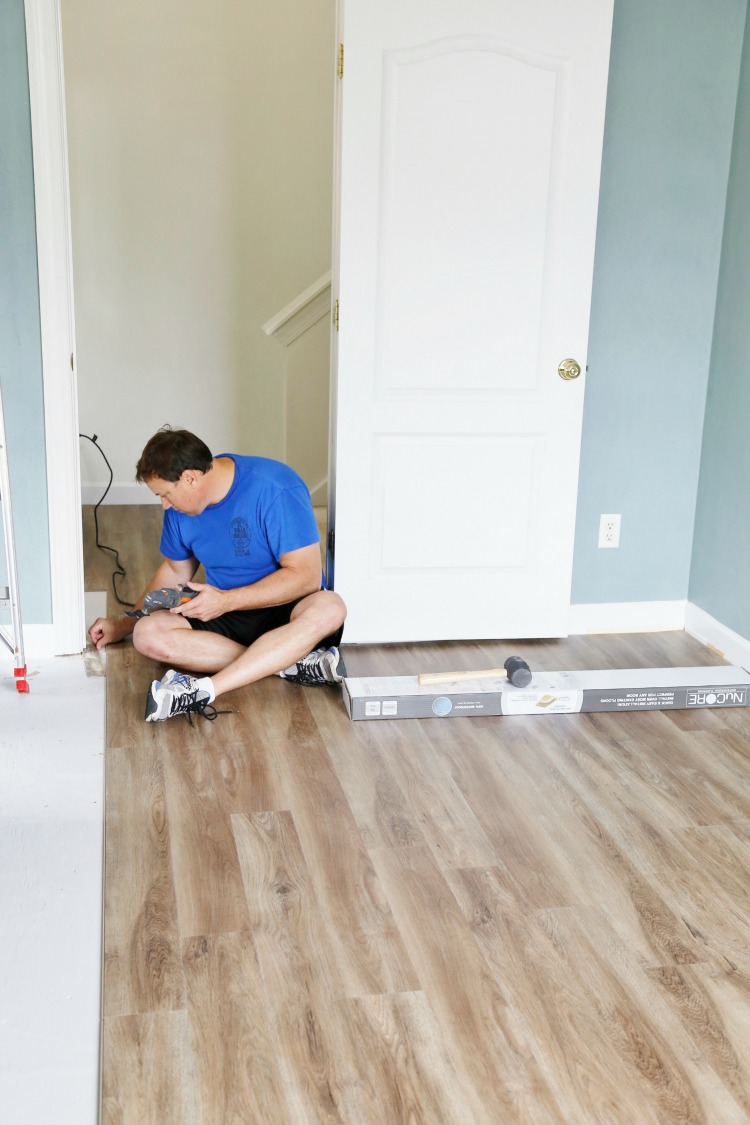
- To cut the luxury vinyl planks simply: SCORE with a sharp utility knife using a triangle square as a guide. I found that scoring on both top and the cork backed side gave the cleanest cut. Next SNAP at that point. Drop that cut plank next to the previous plank at a 30° angle. CLICK and TAP firmly into place. Use the left over piece to start the next row if it is 12″ or longer. Repeat and continue with consecutive rows.
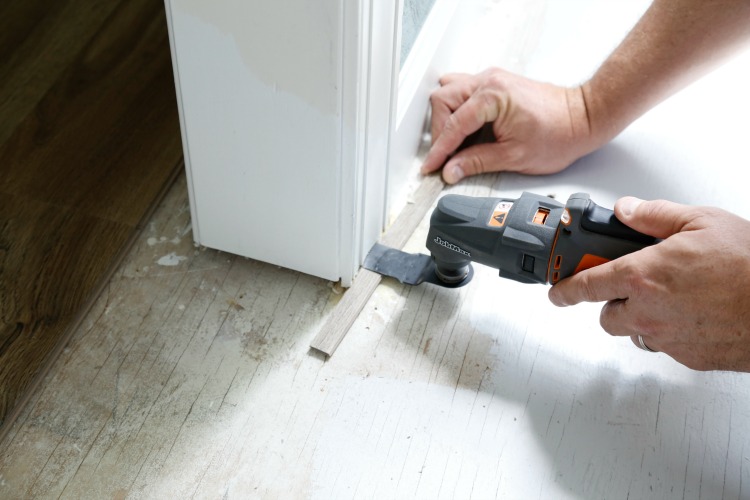
- For under door moldings, lay a scrap piece of vinyl plank next to the door molding and with an oscillating tool to cut out the underside of the door jam moldings. You do this so you can slide the flooring just under the door molding. This tool is fabulous with many handy uses and would make a great Father’s Day, Birthday or Christmas gift!
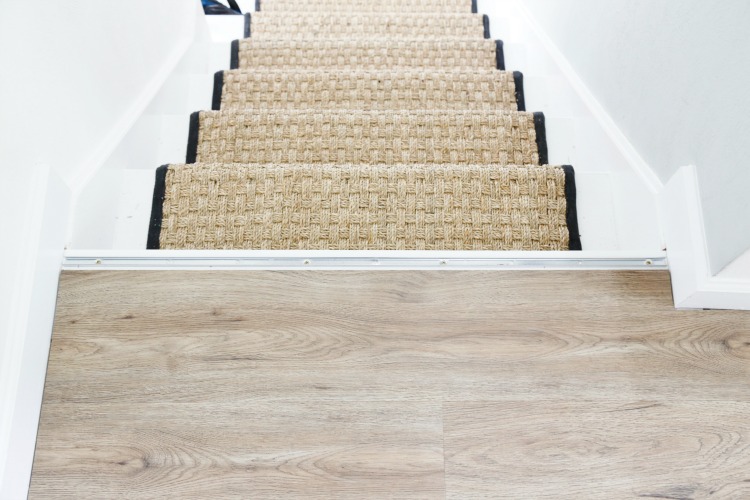
We continued the flooring though to a small landing and into our laundry room. The fabulous thing about NuCORE is that they provide so many specialty extras, like transitional joints and stair pieces like staircase bullnose trim. The bull nose trim easily attached to a provided hardware track.
We installed the luxury vinyl flooring in the playroom/new nautical media room, landing, and laundry room in just a day and a half. It was easy to install and looks FABULOUS! The cork backing makes the flooring so very quiet when we walk on it. They look so crazy real and the cost was very affordable. After all our flooding issues, I’m resting a bit easier knowing these floating floors are 100% waterproof!
 So what do you think? Do you have luxury vinyl flooring? Do you love it? Get ready to SCORE, SNAP, CLICK & TAP your way to a beautiful room. See more of our NAUTICAL MEDIA ROOM MAKEOVER HERE. Feel free to check out the vast variety of flooring options at Floor & Decor!
LOVE IT? PIN IT!
KIM
You might also like:
This is a sponsored conversation written by me on behalf of Floor & Decor. The opinions and text are all mine.
Very nice
Gorgeous!! Thanks for the easy step-by-step tutorial, too. Glad to know it’s quiet to walk one, that’s my biggest beef with real hardwood floors (well, that and my lack of a Swiffer, but that’s a smaller investment :D). Buut I admit, I was distracted by one thing throughout the post: what is the paint on your wall?? It almost seems textured, like the wall is covered in velvet! It’s so beautiful, how did you get it to look like that??
Thank you Mariele! The wall color is Naval by Sherwin Williams. The sheen is flat. But you are correct, the walls are very textured with a quarter circle swirl pattern. They are a pain to paint though with all that texture! 😉 Oh… and go get a swiffer! I use mine every week and love it! Thank you so much for the sweet comment! ~ KIM
I always thought I hated textured walls, but now I’m going to have to consider a swirl pattern. 😀 Thanks for replying!
Wow… It is amazing. This vinyl plank flooring looks awesome. This tutorial is great.
I love this look & it looks like the easiest floor to install! But when you say it’s vinyle Flooring I immediately think of Vinyl lay down rugs that my parents always used in the bathroom or kitchen. And it does look shiny. So is it same material?
Hi Hollie,
No, it isn’t the same material Vinyl has come a long way over the years. The flooring is actually very matte. I wouldn’t consider it shiny in any way. The sun was screaming into the room that day which makes photographing them difficult. The weight and feel of the vinyl planks is very similar to wood laminate flooring. Hope that helps! 😉
Best,
KIM
I can’t get an installer to lay it over ceramic tile. They won’t warranty their work with this product. So it’s not for all floors, but I must say it is beautiful in person. I have 5 or 6 sample planks that I love but alas no one will install it for me
If you decided to do install a laminate flooring then it’s really a good decision. Than the other type of material the installation process of this type of material is different. Through the online there you can find the proper installation guide so that this will make easier to install this type of flooring. Then you can find the best quality material and then assemble the materials and tools. Lining also important and in which direction you want to install the material decide that then start the cutting process. For installation you can also hire a good contractor.
I love this color! I must ask though, does it show a lot of foot prints and dust? I’m hearing a lot of feedback about lighter colors showing a lot of dirt and foot prints! I’d love to see how yours are holding up!
Hi Abby! No, it doesn’t show any footprints at all. This room is on our 2nd floor though so I risk more dirty feet downstairs on the wood. 😉 Overall, we’ve been quite happy with the flooring. It’s very quiet underfoot too, which is nice since that room is where all my kids’ friends hang out.
So, it’s been about a year, I’m wondering how the floor is holding up? Does it scratch easily? That’s my complaint about our engineered hardwood. I notice you have a rug under your wood coffee table, but not under the other furniture legs. Do you have anything protecting those? The floor we’ve chosen is a Core Tec Plus 8mm thick (Nantucket Oak, a light grey). Do you mop yours with plain water? I use a steam mop on my ceramic tile, but I don’t think that’s a good idea for the LVP. Thanks Kim, I always enjoy your blog!
Hi Susan!
Thank you for your comment! The floors are totally fine. Because these are 100% luxury vinyl I do not need to worry about scratching like you would with engineered hardwood. I do put furniture pads under all the feet of every sofa and chair in my house. With 4 kids (2 teen boys) who bring all their friends over, furniture pads are a must. LOL! I also just mop with a damp mop, nothing special. This vinyl is 100% waterproof though, so I could douse it or steam mop it if desired. It’s pretty amazing stuff! Hope that helps! KIM
Thank you, that eases my mind. Do you use a certain brand of furniture pads? I looked at Lowe’s but??? Mostly they had casters or sliders. Confusing! Thanks again Kim. You and your sister (Home Stories…) are my best resources.
Hi Susan!
I don’t remember the brand but I get most of my furniture pads at Home Depot. They have a huge selection. I buy pads for everything in the house… kitchen chairs, barstools, the sectional, my desk, etc. I know that Target carries some too. Hope that helps! ~KIM