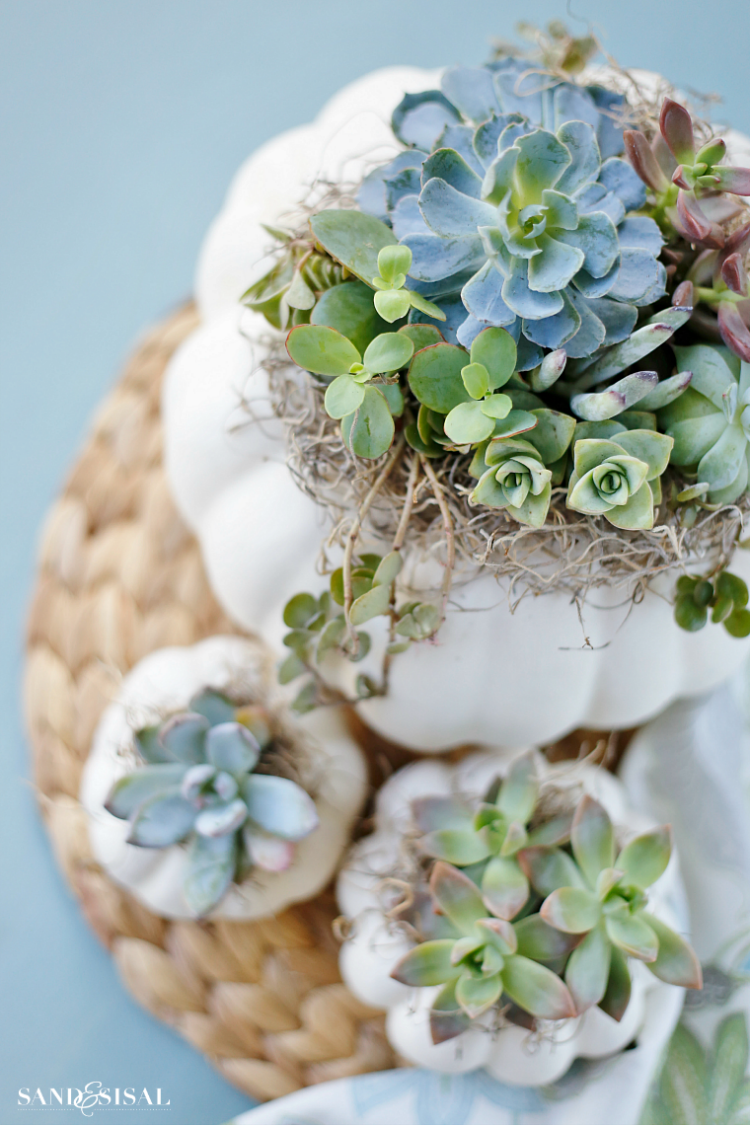
Hi friends! School started for us this week and that means that I finally have a few hours of me time to get back to decorating! This autumn’s color palette here along the coast will be comprised of shades of blues, grays, greens and of course, my favorite whites! Let’s get things started and ease into fall with a gorgeous DIY Succulent Pumpkin Centerpiece. This easy fall craft requires no glue, is reusable, and makes a great hostess gift!
Succulent Pumpkin Centerpiece
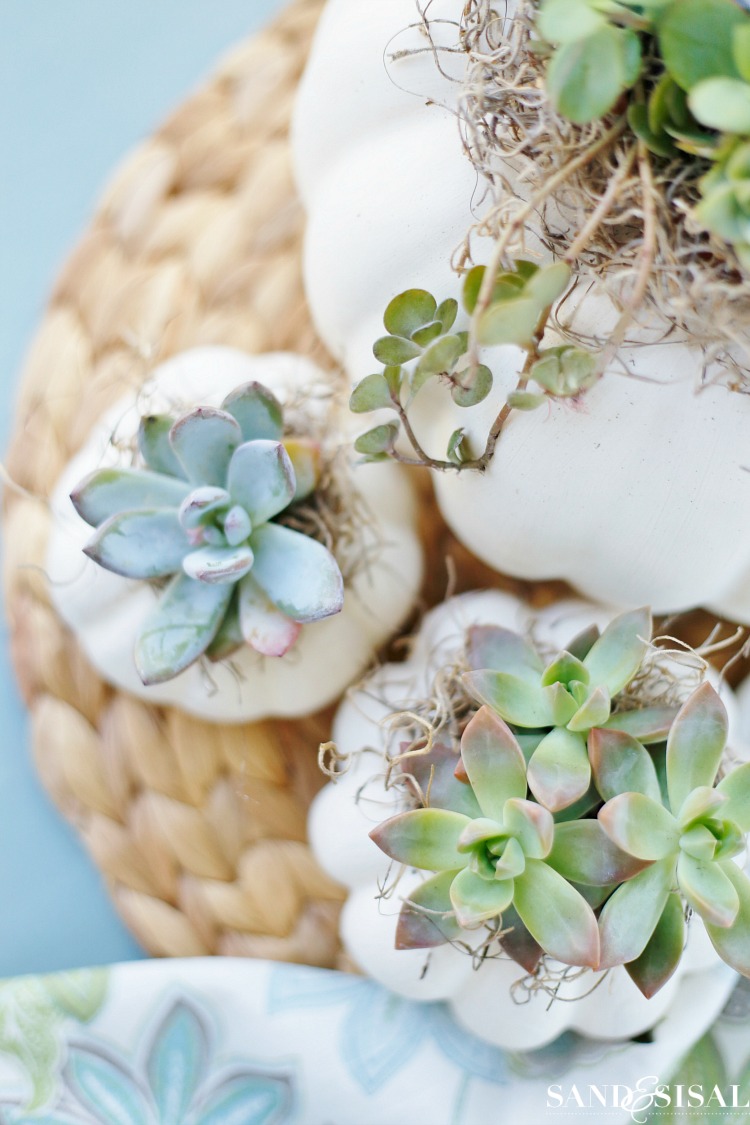
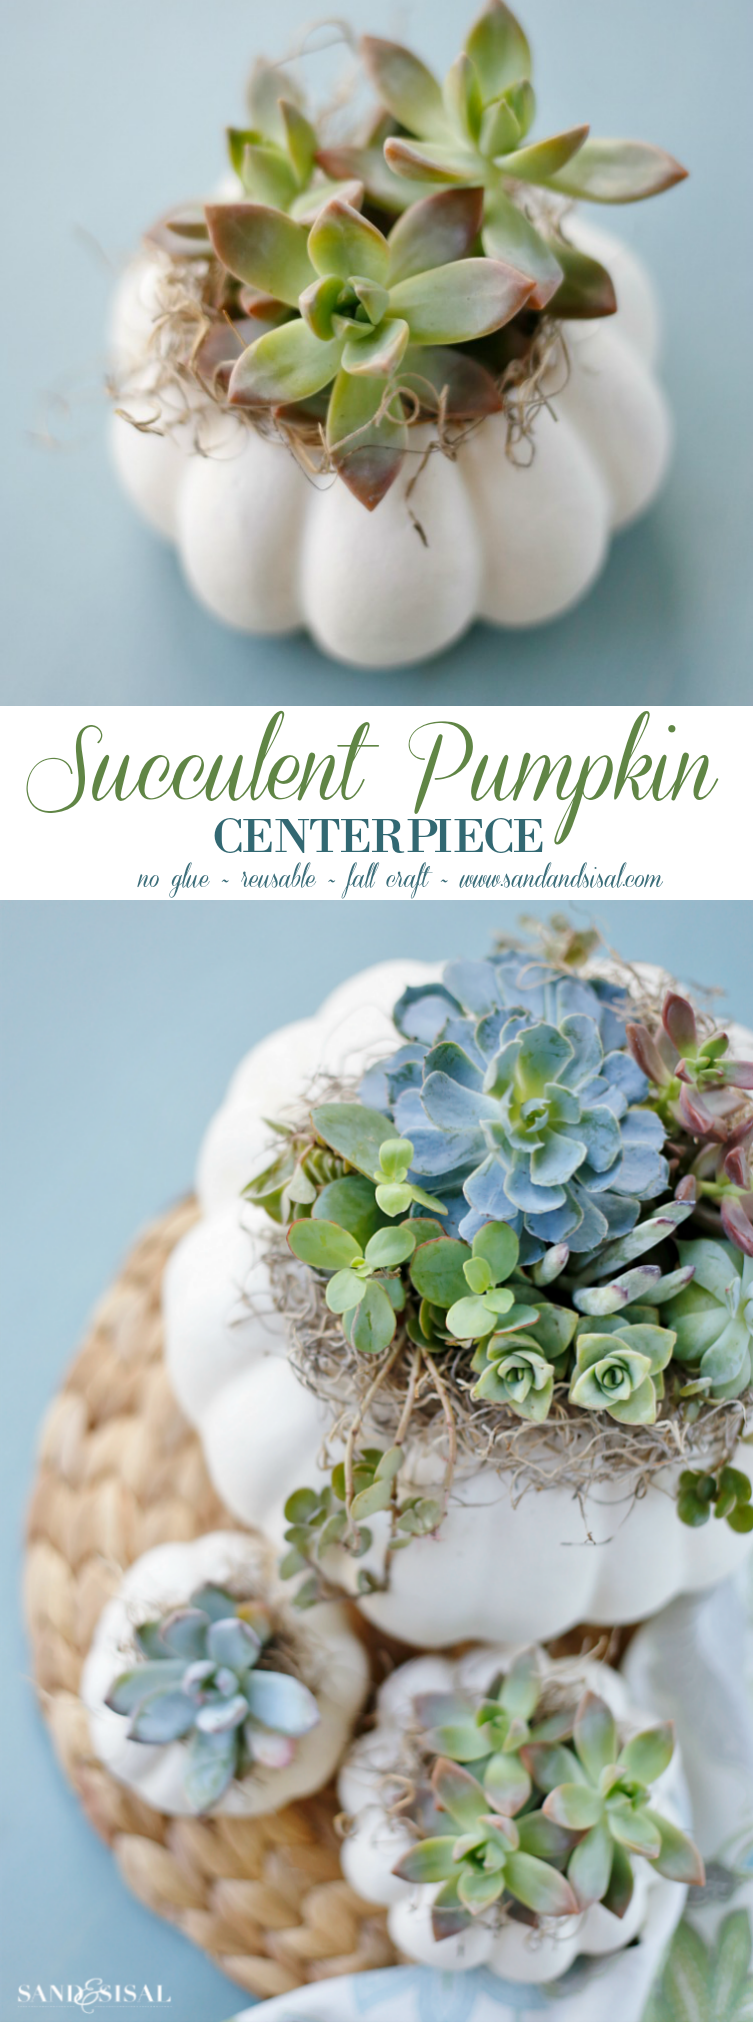
The beauty of this succulent pumpkin centerpiece is that you will create a succulent planter that can be used long after the “pumpkin season” is over. Succulents are expensive and delicate! I have zero interest in risking my investment by hot gluing any of my plants as many other tutorials suggest. This tutorial will allow you to create a succulent planter which inserts into a faux pumpkin and later can be removed and displayed year round.
You will need the following items (Amazon affiliate links provided for your shopping convenience):
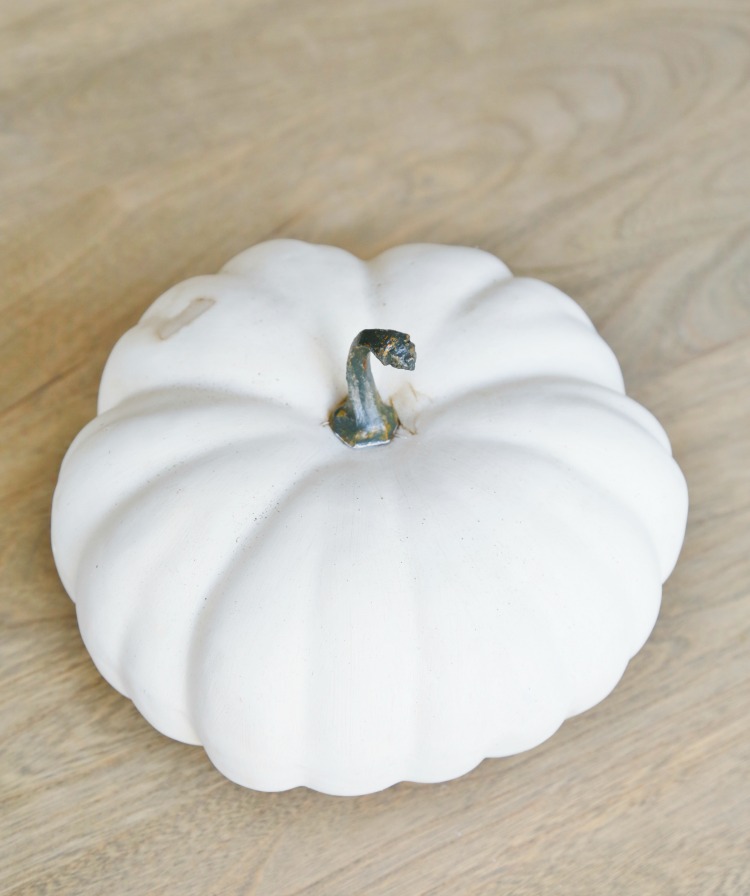
- white princess craft pumpkins (choose your size). I used 3 different sizes.
- drywall hand saw or a serrated knife
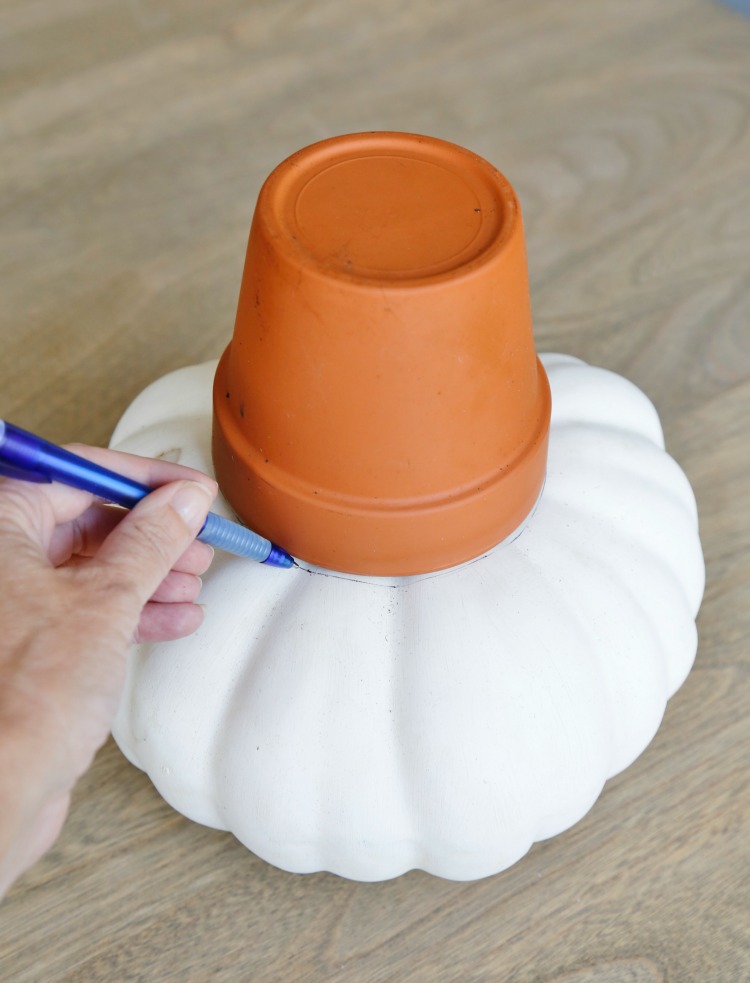
- 4″ terracotta pot
- pen
- variety of succulent plants
- catus soil
- spanish moss
I pulled out a few of the princess white foam craft pumkins I had in my fall bins. If you can’t find the princess shaped pumpkins in white then do what I did and paint them! Head out to Walmart and buy their $5 craft pumpkins and a bag of orange baby-boo pumpkins and paint them with creamy white acrylic paint. EASY- PEASY!
Ok, let’s do some fall crafting… coastal style!
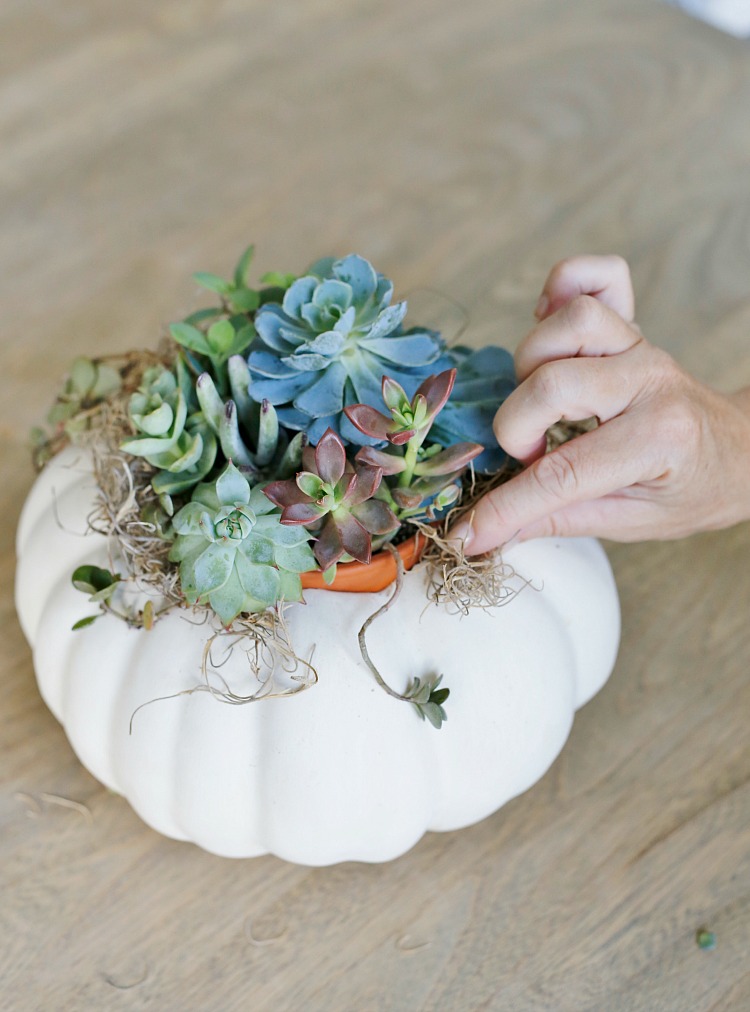
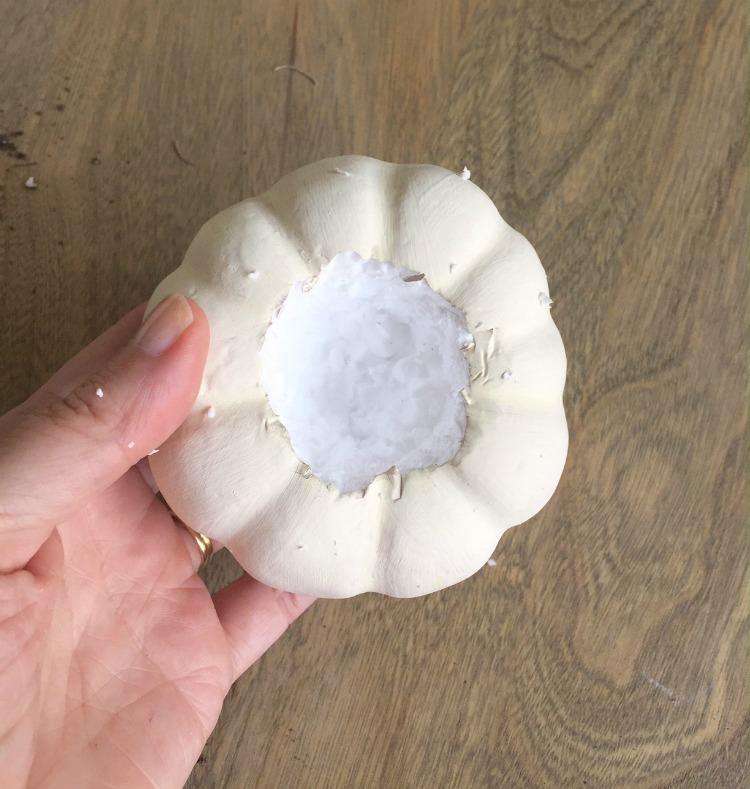
Step 1) Take a 4″ terracotta pot and place it upside down on top of the pumpkin and trace around it with a pen.
Step 2) Using a drywall knife or serrated steak knife cut deep into the pumpkin, around the circle. Remove all the foam inside of your cuts to create a clean space for the pot to snuggly fit inside. Now, I won’t lie. If your pumpkin is solid foam, which I discovered mine was, then the process of cutting out the foam will take a bit more time and will make a mess. Just keep a trash can and your hand vacuum nearby. If your craft pumpkin is hollow the cutting open the top will be super easy.

Step 3) Gather a variety of succulent plants. Choose succulents which work best with the color palette.
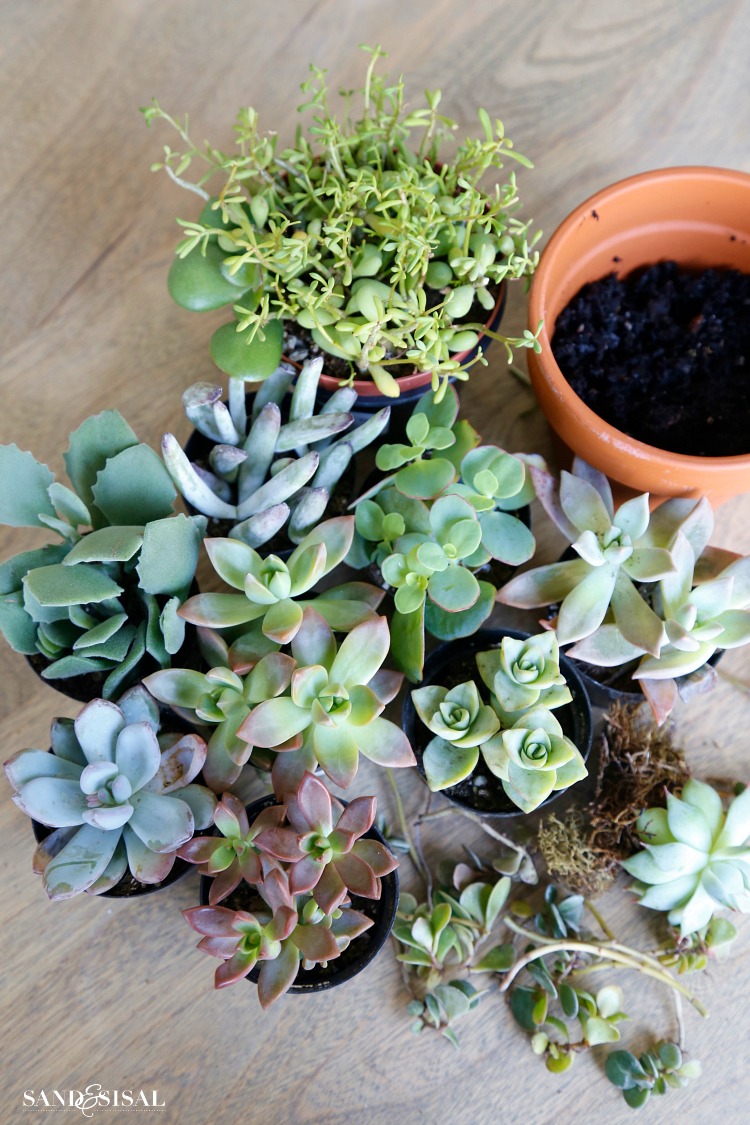
Step 4) Divide the succulents and group together as desired.
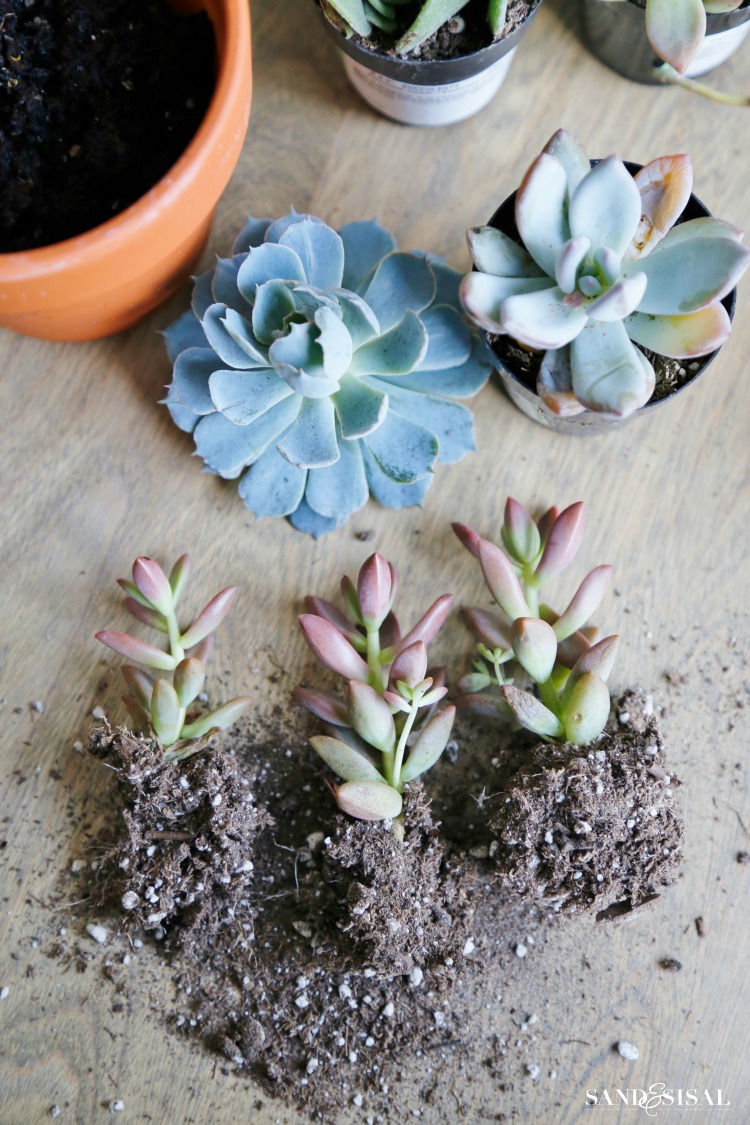
Step 5) Transplant the succulents into the terracotta pot with a base of moist cactus soil (which is highly recommended for any succulent plant).
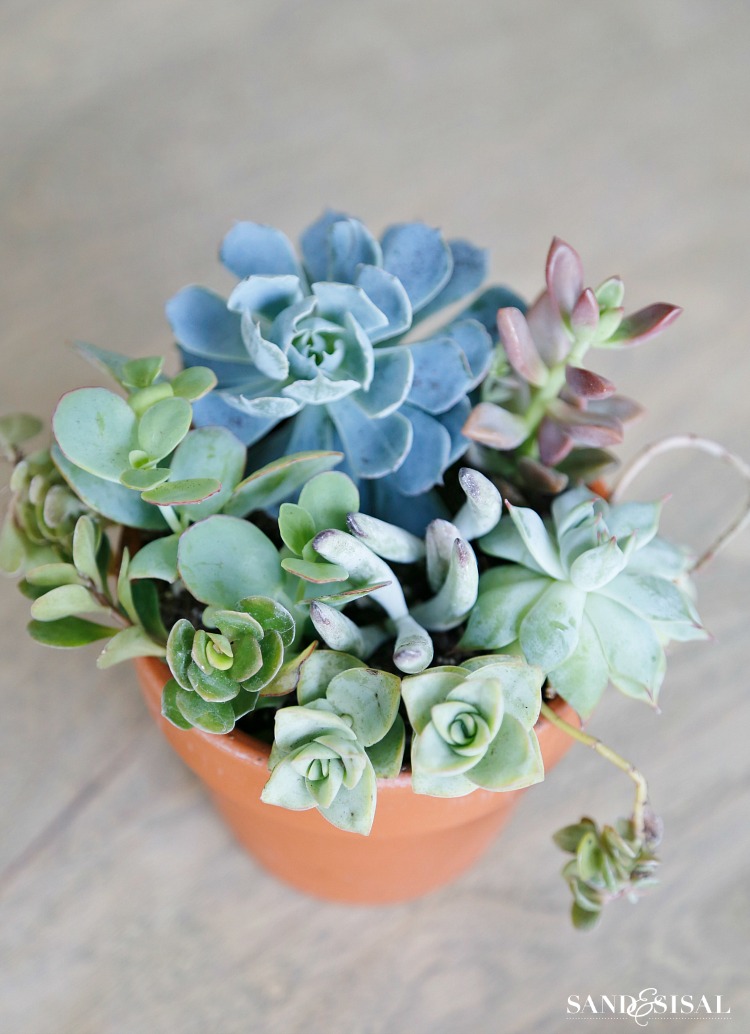
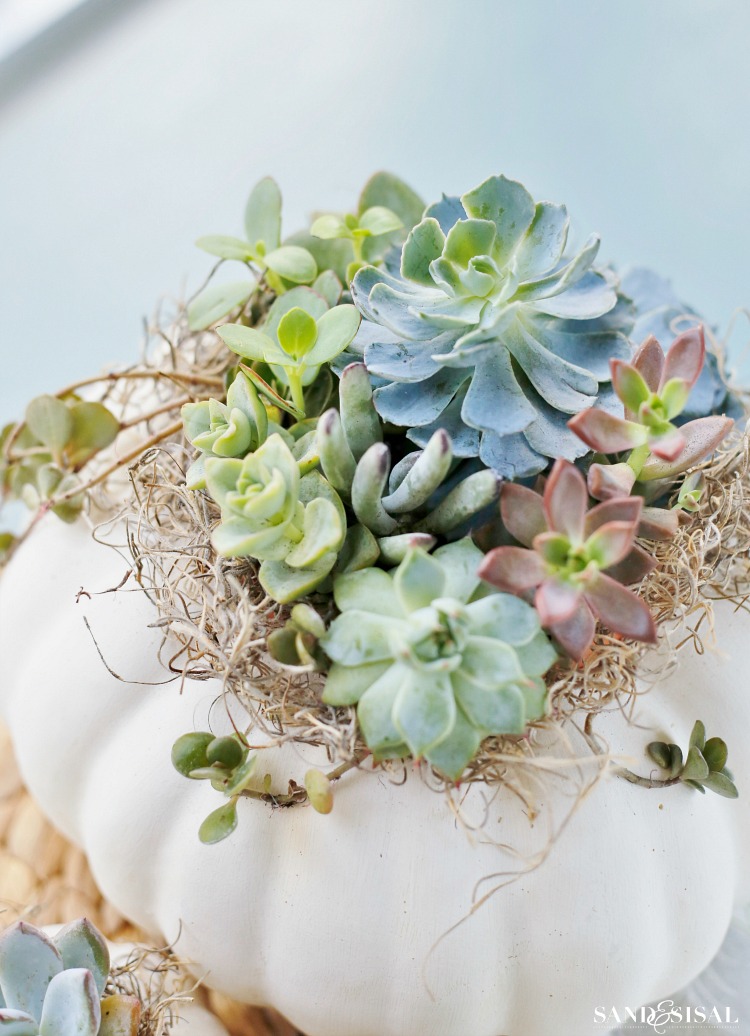
Step 6) Slip the terracotta pot into the pumpkin and hide any exposed edges of the pot with spanish moss.
Repeat the process with any smaller pumpkins, like baby boos.
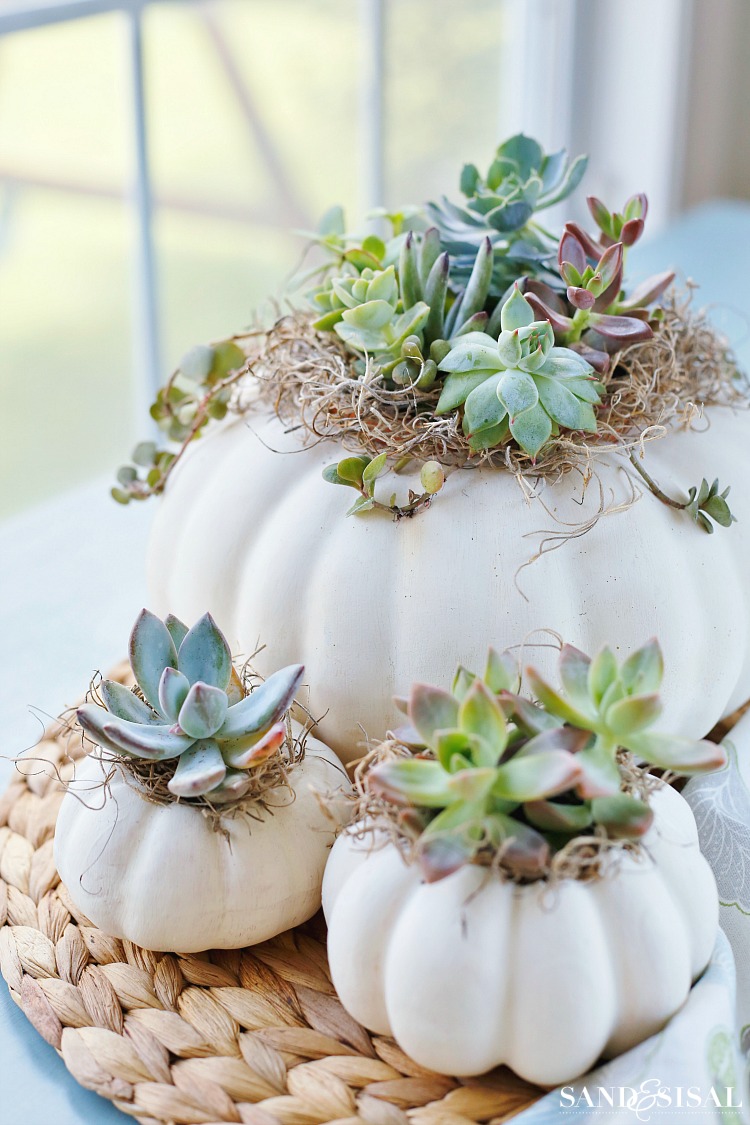
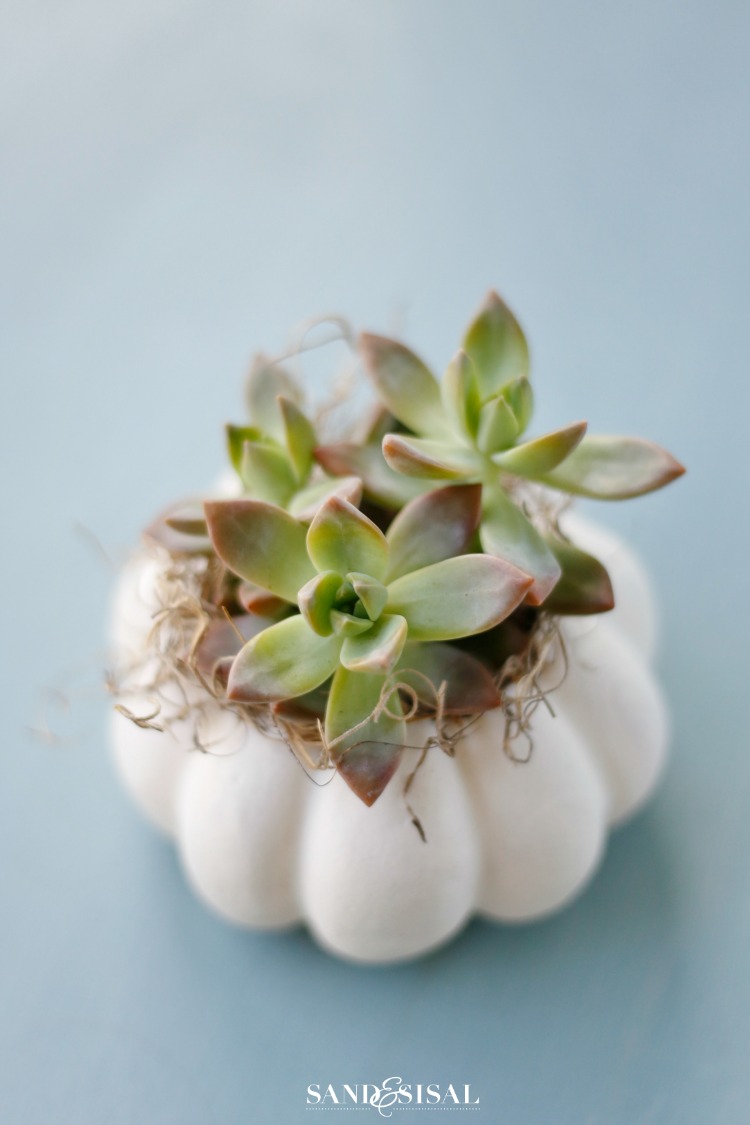
These small white baby-boo succulent pumpkins would make the most adorable place setting gifts. Don’t you think?
If you need to water the succulents then simply pull out the pot and water it. After it drains, set it back inside the pumpkin. Succulents only need watering about once a month.
I really hope you try making a few of these succulent pumpkin centerpieces for yourself or maybe give one to a friend! More easy and elegant decorating ideas are on the way, so please subscribe (free) to have any blog post delivered straight to your email.
LOVE IT? DON’T FORGET TO PIN IT!
If you love succulents (and white pumpkins) like I do then be sure to check out these related posts below!
Very pretty pumpkins! Fantastic idea!
Thank you Lisa! I love how they turned out! I want to make more! Have a lovely week! ~ KIM
i love this kim. such a simple project that looks amazing when finished.
Thank you so much Laura! They were fun to make. 😉
Great ideas. Thank you.
Thank you Peggie!
Love colors of succulents in bigger pumpkin, the blue especially. Cactus soil hard to find here. The baby boo pumpkins are so doggoned adorable, make wonderful little gift. Would be really cute arranged on our half wall between living room and kitchen. Your arrangement and how you planted all with moss to cover edges of planters makes difference, much prettier. Also hard to find terra cotta planters like that this time of year. Grand Junction isn’t great about supplying items except when they think should be bought.
Anyway, loved your post, will keep eye out for supplies.
Happy daze
Thank you JaneEllen!
If you have Home Depot or Lowes, they both carry small bags of catus soil year round. Please don’t worry about needing a terracotta pot. Any 4-5 inch pot would work just fine. Make sure it has drainage holes. Take the pot out of the pumpkin when the succulents need watering (once every 3-4 weeks). Have a lovely day!
KIM
Do you put little pots inside the smaller pumpkins as well? Do the 4″ pots fit in them? Love these and can’t wait to make them!
Hi Kerry! You can put the little pot inside the mini pumpkins but you might need to cut the plastic down a bit. The mini-pots are only 2 inches wide. A votive works well or you can just place the soil directly into the foam pumpkin. Hope you have fun making them!
You always come up with so many creative ideas. I like the simplicity of this, and it creates an understated fall presence as opposed to the bright orange we see everywhere this time of year.
Hi Kim. Our readers will love this tutorial 🙂 We’ve included it in our latest craft inspiration roundup for this week. https://craftylikegranny.com/fall-craft-ideas/ Cheers Emily 🙂
Love love love your creative ideas.. especially love your coastal pumpkins.. eek! Thank you for sharing! Blessed indeed!
Thank you so much Lori! Have a beautiful week!
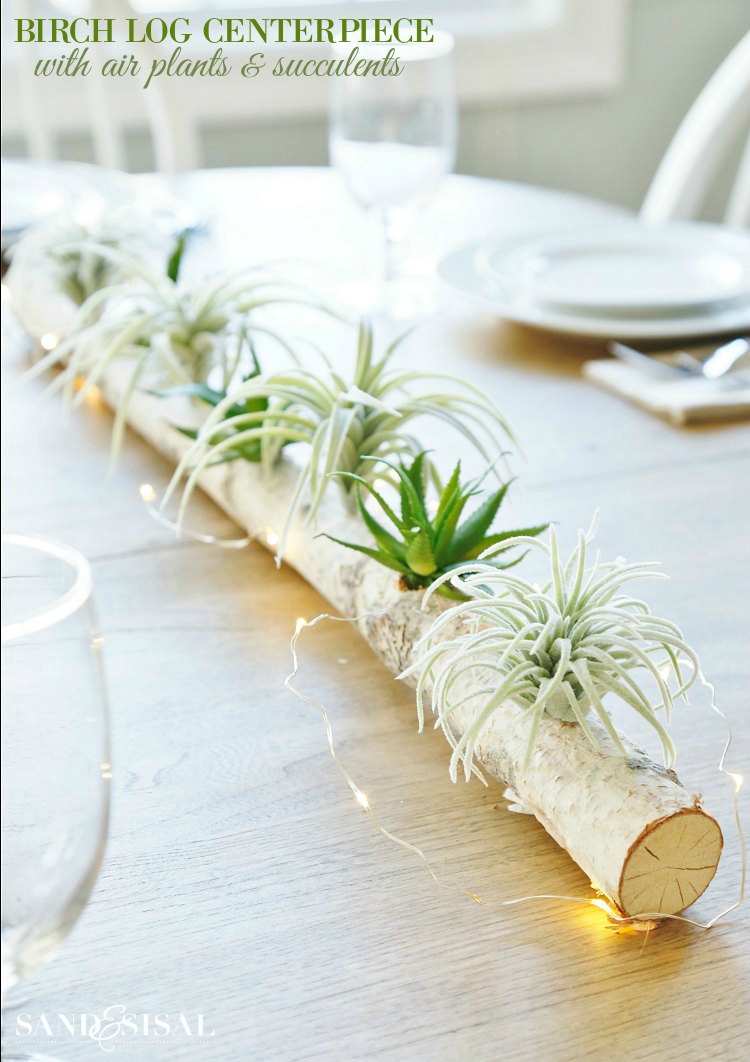
Wow! love this idea. I’m in Phoenix and my fall decoration include baskets of pumpkins, pine cones, and succulents. This is a great alternative! Also, I love the birch wood centerpiece!
Thank you Kristin! I appreciate your sweet comments! Have a lovely week! ~ KIM
What about using Real pumpkins.
Hi Anne Marie! You certainly can use a real pumpkin but it will only last about 1 week before it rots. A faux pumpkin can be used year after year and you can also insert any flower arrangement inside. But please feel free to create one that works best for you. Have a great week! ~ KIM
Kim, this idea is adorable! I must admit, I’m a sucker for succulents, so I’m slightly biased haha. They way you have arranged them within the pumpkins is spot on, and looks amazing.
I also love how you’ve considered that the pumpkins will only be around for a few months, so making the succulents easy to move around your home once the season is done is great.
What made you think to combine succulents and pumpkins? It’s not the first thing that would spring to my mind, but I’m glad you thought of it 🙂
Thank you Emma! The idea of pumpkins and succulents has been around for awhile but executed in several different ways. Most tutorials required glue and I didn’t want to damage the succulents. With this method you can also simply pop in any potted plant or vase. Thanks so much for stopping by!
You’re welcome Kim 🙂
Oh dear, I must have missed the others then! But I’m glad yours doesn’t involve gluing the succulents, as you’re right, damaging them would be bad! So thank you for keeping that in mind 🙂
We were so inspired by your post that we added it to the 23 Best DIY Fall Craft Ideas list at Craftcuts.com! Thank you for inspiring us for this Fall holiday season! Keep up the great work.
You can check out our post here: https://www.craftcuts.com/community/home-decor/diy-fall-craft-ideas/