Not that I’m biased or anything, but I have the most wonderful and talented readers in the world! Nothing warms like heart more than when a reader reaches out and let’s me know that they were inspired by one of my projects to create something amazing in their home! One of my sweet readers, Genna Lunsford from Florida, said she was inpired by my Painting Stripes Made Easy tutorial and is sharing her beautiful coastal bathroom makeover with us today.
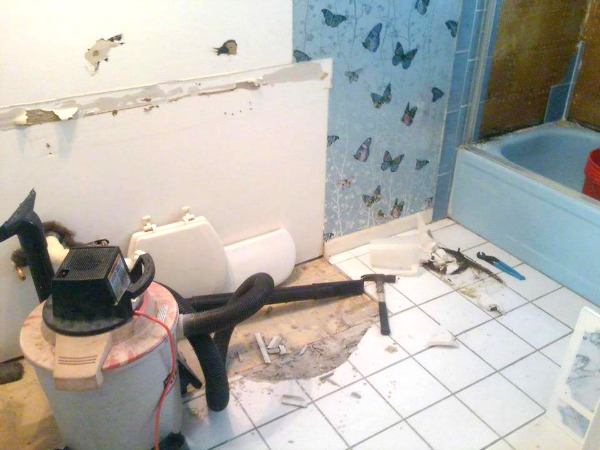
 Take it away Genna! “Pre-remodel: the bathroom was original from the 1980’s with blue bathtub, vanity/sink and as you can see in the before shot beautiful blue foil butterfly wallpaper!”
 “We bought the house in 2004 and this was the last thing to be remodeled. We took it down to the studs. Turning the bathtub into a shower meant relocating the drain with a jackhammer. (NOTE: cover everything within 100 feet or just move it all out the room) We then moved the toilet over 6 inches. My husband built the new shower wall with a drop ceiling so that we could incorporate a rain shower that came straight down from the ceiling. Since we had gone this far, we then decided to pull the old carpet and baseboard out of our bedroom as well.”
“I was so happy to find your diy on how to paint stripes.”
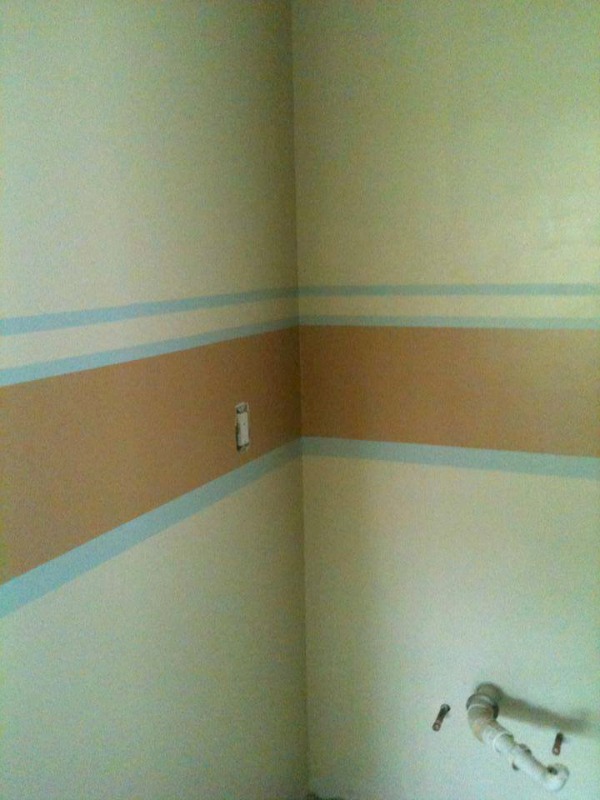
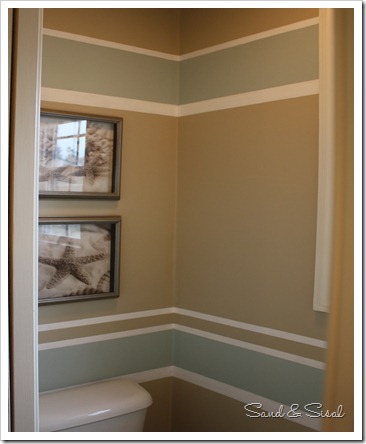 The striped walls really brought it all together. The tricky part was that I wanted my colors to be opposite. With all the dark tile and small space i wanted the main part of the walls to be the lighter color (almond paste). First i measured how high the vanity and backsplash were. Then i marked notches with a pencil so i knew where my bottom line would end. I then painted an 18″ section of the blue accent and let that dry a few hours. I then had to remark the bottom 38.25 inches from the floor. Using the level i marked off a guide line every 6 inches so that i knew where the bottom of my bottom line would be. I decided to make the bottom blue stripe twice as thick as the top blue stripe and the same thickness as the almond paste stripe. I definitely recommend using the Edge Lock painters tape by 3M. It creates magic lines and you don’t have to worry about bleed thru.
 “We found a nice natural looking stone tile for the shower walls and ceiling. Using the same accent glass tile piece that borders the shower and is used on the shower floor, we also created a niche for shampoo (or coincidentally a bottle of wine is also a perfect fit). We used the same accent instead of a marble jamb to separate the smaller 12″ tile in bathroom and the 18″ tile in the bedroom. We found the vanity and top at Home Depot for a bargain and it has plenty of storage.”
 “When we show off the bathroom, no one can believe that Ipainted it and it is not wallpaper. The paint colors are by Olympic Babbling Brook and Almond Paste. The brown is by Behr and it is Peanut Butter. It was the hardest color for me to pick because of all the other browns in the bathroom.”
“Now I am on to burlap and lace wedding diy projects for my daughter’s wedding next July. Lots of mason jars coming my way! Thanks for the inspiration!” ~ Genna Lunsford

![]()
What a fabulous redo! Great color choices and unbelievable job on the stripes!
I think her color choices were spot on! Thank so much for taking the time to comment! ~ KIM
Wow, what a great job. The stripes are all so crisp and defined, will definitely have to try that 3M tape. Thanks for sharing.
The 3M ScotchBlue tape is awesome! It comes in so many different widths and “strengths” of adheasiveness based on your needs. Thanks for giving Genna some comment love!!! ~KIM
The stripes are so perfect!!
I agree! They are contemporary and break up the space so nicely with the colors she chose! Thanks for commenting !!! ~KIM
The stripes and the colors she chose are beautiful! I’ve been playing with the idea of beadboard wainscoting in our bathrooms, but now I want to make stripes!
Oooo I so agree! I’m seriously crushing over that beadboard vanity. It is beautiful! Thanks for stopping by KC!
~KIM
The beadboard vanity with the louvered doors was the perfect choice. Would love to see “after” pictures of the floor.
Hi guys! Thanks for all the love. Here is a link to the public album on facebook. Check out the awesome shower niche! https://www.facebook.com/media/set/?set=a.683575024991611.1073741827.100000173588114&type=1&l=798bca28e2
Checked you over on FB and love your bathroom re-do! Simple, stylish and sumptuous. Heart. Hx
I LOVE the stripes! It really makes the room.
Allison
What a GREAT job y’all did! Looks very professional. Can’t believe it’s a DIY.