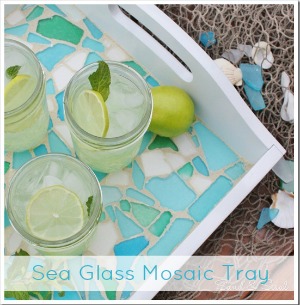
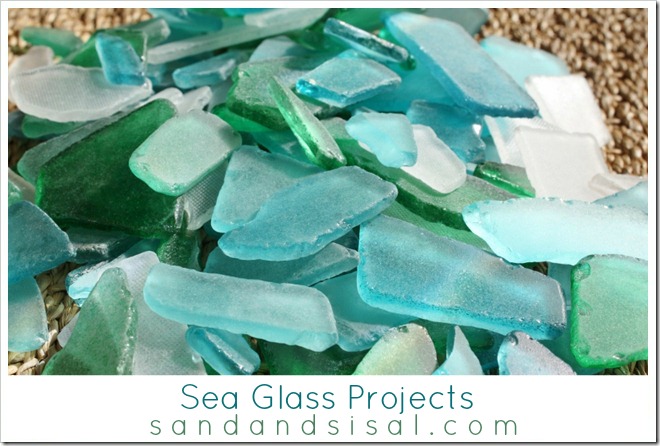
Frosty, sandblasted Sea Glass accessories are hot this season in decor. I have been a long time fan of sea glass ever since I made the Sea Glass Mosaic Tray and discovered the multitude of Sea Glass Projects that can be made.
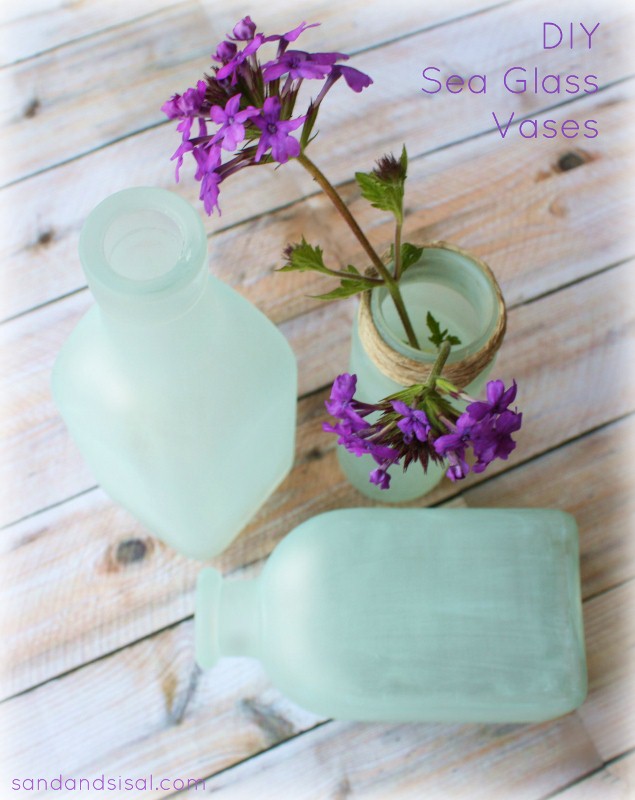 Pottery Barn has sea glass vases this year, for a hefty price $63.50. Of course we all know they aren’t authentic sea glass, but have the beautiful appearance of sea glass. I wanted them badly. And what’s a DIY girl going to do when she wants the look but can’t afford it? She’s going to figure out how to recreate the look herself!

I did! You are not going to believe how easy this is!
DIY SEA GLASS VASES
You will need the following:
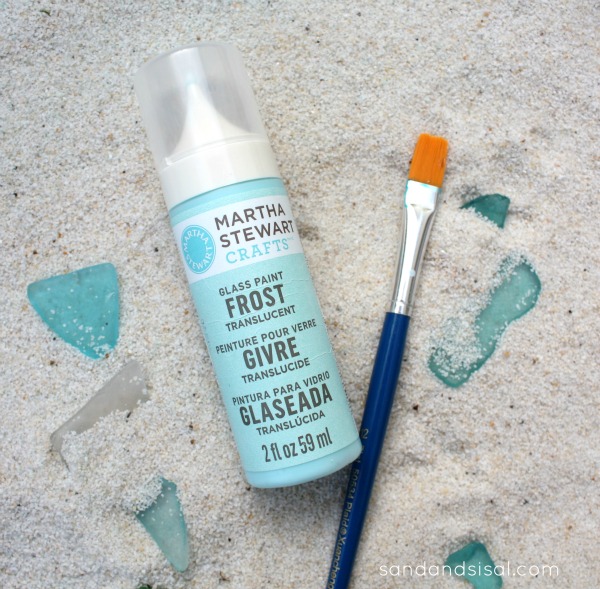
- glass vases, bottles, jars, votives ( whatever you like)
- rubbing alcohol
- a flat tipped, soft paint brush
- Martha Stewart Crafts® Frost Translucent Glass Paint. I recommend using the color “Sea Lavender”, which I used or the color “Beach Glass”. You can find these colors at most craft stores, like Michaels, but make sure you buy the GLASS PAINT, which is usually kept in a separate area of the store with other glass paints.
Here are 2 links to where you can purchase the paint online:
Martha Stewart Paint Set, 2-Ounce, Frost Translucent Glass Paints
(Amazon affiliate)
Martha Stewart Frost Translucent Glass Paint Set of 8 colors
Directions:
- Clean the glass with soap and water. Dry it. Then clean it again with rubbing alcohol. This removes an residual oil or residue.
- Put a dollop of paint on your brush an start painting your vase in ONE direction. I started my strokes going VERTICALLY from top to bottom. Add more paint to your brush as needed. Continue until covered. TIP: to hold your bottle or vases, place your hand or fingers inside the bottle neck.
- Allow to dry 15 minutes then REPAINT but this time paint in the opposite direction- Horizontally. I found that a second coat covered the glass better and eliminated most brushstrokes. The paint is dishwasher safe if air cured for 21 days or you can follow the baking directions the manufacturer recommends.
 That’s all there is to it. I was shocked at how easy and fast it was to achieve a sea glass look just like Pottery Barns! And all it cost me was a bottle of the Martha Stewart Glass paint!
I like to save all my glass spice jars and glass jars that scented candles come in. I’ve found them very useful for bud vases and crafts.
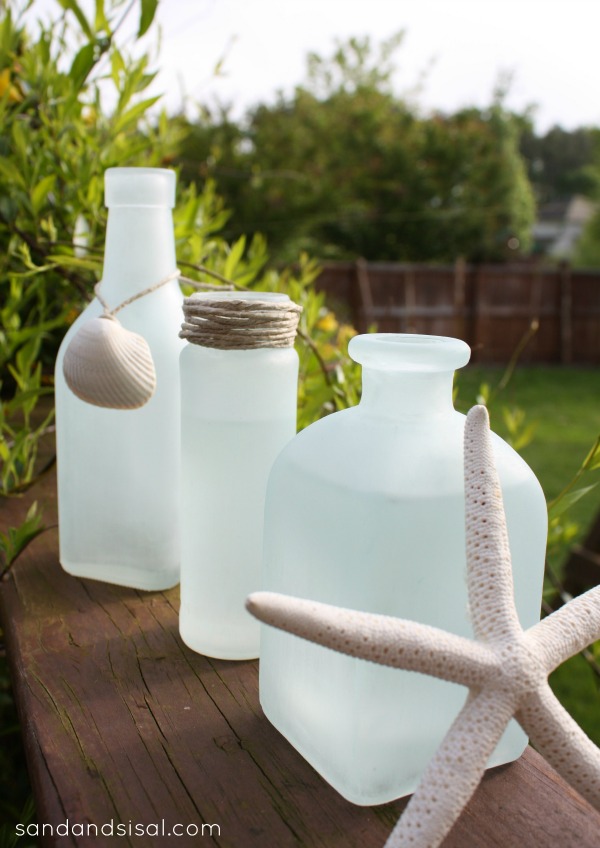 You can easily embellish the vases with sisal twine and shells if desired.
 Wouldn’t a few of these make a nice Mother’s Day Gift?
Be sure to pin your favorite photo above for future reference and follow me on Pinterest if you like.
You might also enjoy:
Kim
Kim…I love these!! I can’t wait to try it. I usually just read blogs…and pin on pinterest but this time…I have to give this a try!! Thanks so much!!
Thanks Sandy! I’m telling you, I was soooooo surprised how simple it was to do. It’s totally that paint that does the trick. You’ll love it.
Where can I purchase a bottle with a rounded opening like that one? I’m not even going to bother looking for an old one, I need one very quickly for a gift, this weekend, so I’m ready to gulp…………pay! Even if it had food or something in it, I’ll find that 🙂
Thanks, Kate
Hi Kate,
These bottles were either old spice containers I already owned, or oil & vinegar bottles from Target. Super inexpensive!
So pretty! I’m obsessed with sea glass. I’ll need to try this. x
I am too, have been for most of my life, but dang it, no one’s littering on the other side of the globe anymore, for us to find much of it on our beaches here 🙁
There’s still plenty of littering off the coast of the U.S.. NYC dumps tons of garbage off the coast, as does some other states. Lately, I’ve found a lot of beer bottle glass.
And it all washes up on Cape Cod’s South Beach lol. Kim, have you ever tried to remove this paint from the glass? I found an old Boston maple syrup honey bottle …must be 80 years old. It’s broken but all the words are on the bottle …perfect break I’d say, lol. I’ve used this paint before , it’s awesome but I’ve never used the translucent. I would think it would be a little too much texture to look authentic? Have you tried sanding it with fine grit paper after painting to flatten the paint v surface a bit? Just curious what you’ve tried. The ones in the pic look very authentic beach battered glass. But I really would like To know,also, if you’ve ever tried to remove the paint if there’s a mistake or if you just want it off in the future. Gorgeous and nice job. For those of you who were asking where to get it or about other colors and can’t order online you get get this paint at any of the large craft stores but it’s not in the paint section in some of the stores, just ask. Tough to get at xmas tho. Thanks. And FYI Kim, it took me quite a while to type this, there is a Forestry , discovertheorest.com ad that constantly pops up under your curser. Not sure if you know that.. Thanks…Laurie
I’ve found if you use inexpensive pouncers instead of a paint brush it looks more authentic! You do have to do 2-3 coats to get the right look! But they turned out beautiful! I did a bunch of iced coffee bottles for my daughter’s wedding last year!
Great tip Jackie!
LOVE this trick! Super simple and inexpensive!!!
Kim, I love this! I collect glass bottles and interesting jars, I have a bunch hanging out under my kitchen sink waiting to be used. Thank you for sharing!
None of the zillions I save have a rounded edge on the opening, though…………anyone have any tips on what product has that, or where I can buy one in a store?? THANKS!
Oh my goodness Kim, I love it, just beautiful!!!
XO
Kristin
These turned out beautiful!I have pinned this and will be giving it a try.
Thanks for sharing,
Suzanne
Pieced Pastimes
Hmmm… thanks for sharing. I have been drooling over some rather pricey sea glass items. Now this is definitely doable!
Happy Monday.
Hugs, Gee
Okay– love these!! So easy and beautiful. Will need to do this sometime this summer!
Love it, so simple and yet stunning!
Love it!! Thank you for sharing!
Ohhhh – these are lovely! I’m going to try this. Thanks for sharing with us! 🙂
SOOOOO doing this!! AWESOME! and great tutorial!!
WOW!!! These are absolutely beautiful!!! I cannot believe how gorgeous they look. I am so excited that you gave us all the instructions to make our own. I can’t wait to make some. Thank you for this amazing project and for your awesome blog!!!
Who knew it was so simple to do?! Thanks for sharing. They look lovely!
I love these! Absolutely gorgeous! I’m pinning.
Kim…I’m in love with this project! What beautiful vases that would make for an awesome party centerpiece! Thanks for the great tutorial! <3 Heidi Rew
I can’t wait to try this project for myself to dress up my cottage In Kill Devil Hills, NC.
Kim, these look amazing!! I too was drooling over the Pottery Barn bottles. Thank you for sharing such an easy way to achieve the same look. I can’t wait to try this myself.
Regards, Haydee
Cute, cute, cute! Does her paint come in other colors? Your tray is adorable too. Thanks for sharing the secret with us!
Liz
I was wondering this, too. Or, if there aren’t other colors, if you can layer a colored glass paint under the frost paint.
It comes in several colors, I just happened to love this one. 😉
I am obsessed with sea glass! (Used to scour the beach line as a kid, collecting it. Blue and red sea glass was always the most rare and precious.) Anyway, this is a gorgeous project, and I can’t wait to give it a try. Shared on my FB page and with my Twitter followers. Thanks for sharing this awesome tutorial!
Great idea! Thank you 🙂
Get out! The sea glass vases look awesome! Off to Hobby Lobby I go…
I love your blog name. Thanks for figuring this out for us and writing the post. I love anything beachy and I can’t wait to try this out.
Thank you for the additional inspiration for redecorating my bedroom. Doing a “beachy” decor with seaglass and sand colors.
Has anyone else had a hard time finding the Martha Stewart paint? I’ve looked in both my local Joann’s and Michaels as well as online and no one seems to have it. Is there another brand I could try because I am supposed to be making these for a friend’s wedding and didn’t realize it would be so difficult to find the Sea Lavender paint.
http://www.createforless.com
I had trouble as well, so I googled it and this is the ONLY site that had frost translucent.
Sorry if it’s too late!
I have see it at every Michaels store in our area. Michaels is the primary carrier of all Martha Stewart products. But you can also order it directly from Plaidonline.com which is the maker of the paint. Here is the direct link. 😉
http://shop.plaidonline.com/martha-stewart-crafts-glass-paint/169/product.htm
I found the frosted translucent beach glass at:
http://www.dickblick.com/products/martha-stewart-crafts-glass-paint/#items
Just so so pretty Kim! I love the addition of twine and shells too. You are right they will make just gorgeous gifts. I’ve lots of non-throwawayable jars squirreled away to transform. Hope I can find that glass paint in the UK! Thanks so much for the inspiration.
These are gorgeous! I can’t wait to do this over the weekend!
These are lovely! I came across you on Pinterest this week, and I am featuring these vases on my blog today if you’d like to stop by! http://www.unoriginalmom.com/original-fridays-16/
I love your seaglass bottles. Does one see brush strokes on the finished vases?
Hi Judy, there is a slight texture to it, but if you use a flat paintbrush and keep the strokes long and smooth and then apply the 2nd coat in the opposite direction then that will minimize any stroke marks.
Hope that helps!
Thanks,
KIM
What do you think would happen if you did 2 coats but instead of a brush you stippled it on with something, fully covering it, but a more “roller” type result?
awesome idea……………they sell those little tiny rollers, someplace, maybe Home Depot’s paint dept? I can’t say for sure, but I’ve seen them near the sea sponges and other ‘teturing’ products.
Hello to every body, it’s my first pay a quick visit of this website; this webpage contains amazing and
truly good material for readers.
I just love this project Kim! So pretty and I can’t wait to try it! Pinned it! Big hug friend and I hope all is well!
Love this! I saw it on Pinterest and pinned it. I bought glass paint this past weekend and have started painting any clean glass container I can find!
After two vases and 5 ornaments, I’m skipping the tray and going right for the kitchen table. Is that wrong???
ha! Who am I to question a woman’s creativity? Go for it ! Send me pics when it’s done, I’d love to see it! Thanks for following along with the blog too! ~KIM
oops I forgot to mention the table would be with the sea glass from Pier 1…
Hi – I have tried to paint my wine bottles, but for some reason I can’t seem to get them to look like yours in your pictures? What type of brush do you use? I ended up using the round tip brush and painting them the way you suggested your glass ball ornaments. It looks pretty but really wanted a smooth look! THanks!!
Hi Nancy, I show a pic of the brush I used. It is made for glass paint and has a flat tip. I do not recommend using a round brush, it will be very hard to avoid brush strokes. I know that Martha Stewart has paint brushes specifically made for her glass paint. They should be showcases next to the glass paint also. Use a flat/straight edged brush and stroke in one direction (ie: don’t stroke back and forth). Allow to dry then stroke in a perpendicular direction. You can see from my pics that they are not entirely smooth, but do have a bit of texture. You could try the foam pouncer method also, like I used on my latest Sea Glass Ornaments. Hope those tips help! Best of luck. ~KIM
I love this!! Have you tried washing them? Will the paint come off?
Hi Suzanne! The paint is specifically made for glass and is dishwasher safe after the curing time. Very cool paint! Thanks
~KIM
Can’t wait to try. I love sea glass.
Hi Kim,
Thank you for sharing the fun!
I love these, they look absolutely amazing and super easy to create!
I tried this the other day and it is so simple and it came out beautiful.
That is wonderful! Thanks for trying it out! ~KIM
Where can I find this paint? Michaels doesn’t show it on their website and I’ve looked at Walmart and Hobby Lobby.
Hi Cherri! Michaels does not carry all of their store items online. You need to go to the store itself to find it. It is located in the glass paint aisle, not the normal paint aisle.
Love these! Painted my bottles once and left overnight to dry. When I added the second coat the next day, the first coat started to come off! Not sure why that happened–any idea what I could be doing wrong? Thanks so much. Really enjoy your projects.
Hi Mary,
I’m not sure what the issue could be, except you are using the regular Martha Stewart paint and not her specific glass paint????? The reason why I say that is because I have tried to remove the paint within 30 minutes and it was almost impossible. The other is issue could be that the glass needed to be cleaned with rubbing alcohol 1st. Also, shake all your paints before using.
Hope that helps! 😉
KIM
Thanks, I’ll give it another try. Right paint, etc but my alcohol expired 3 years ago! Maybe that was it!
I couldn’t find the paint anywhere except online and I accidentally bought the clear color and not the sea lavender color as specified. Make sure you double check that you have the right color! The clear comes out as a frosty white which is still pretty.
Is this food safe or is there a way to make it so? I’m thinking of doing a set of dishes for my house Christmas present.
I looked into that with the company and they did not recommend it for food.
Hi, I really love that white frosted color! I was wondering if the amazon link you shared is for that specific finish? Thanks so much! Beautiful touches btw! 🙂 Thanks for sharing.
Yes, it is 😉
I LOVE this!! I was directed here from Pinterest, and I always like to give credit to the actual blogger! So many people say “Oh, I found it on Pinterest” but don’t credit the blog!
I will be moving into an apartment in August and think that these would look perfect in there!
Katie | Katiavagyok.blogspot.com
Super cute! I have a bunch of glass bottles lying around, and wasn’t sure what to do with them. I’ll be doing this to a few that I know will make good vases 🙂 I’ve been thinking I could do this do a jar and break it, to use as mosaic tiles. I’d be sure to sand them down of course. Thanks for sharing 🙂
I accidentally bought gloss opaque bottle instead of translucent. Do you think it will still work?
Hi Nessa,
Ooops! I’m sure it will look pretty, but it won’t look like sea glass at all. It will end up having a shiny glazed ceramic appearance instead.
KIM I love everything you have done.You are very talented. We are proud of you. Love,mom
Thank you mom!
I am wondering if this could be done on plastic, to use as a cover over fluorescent lights in my massage room….
Hi Mary,
No, this paint is specifically made for glass only. Sorry.
I cant seem to find this paint anywhere 🙁 help?
Hi Bana! I’ve updated the product link for Amazon in the post (THey have quantity) Other than that you should look at the major craft stores for the glass paint. (Be sure to specify GLASS PAINT).
Love sea glass! Cannot wait to try this tutorial. Thank you!
I most absolutely LOVE these sea glass vases and I am in love with anything that is associated
with the beach and the ocean! I’m going to add this to my list of projects to do!
Thank you Mary Ellen! These were one of my most favorite projects!